|
|
|
|
|
|
|
|||||||
|
|
|
||||||||||||||||||||||||
|
|
|
CRM for Effective Business Management
Contact us if you need to change the app for your business. Contact us if you need to install the app on a Cloud server with Linux.
|
|
Clients
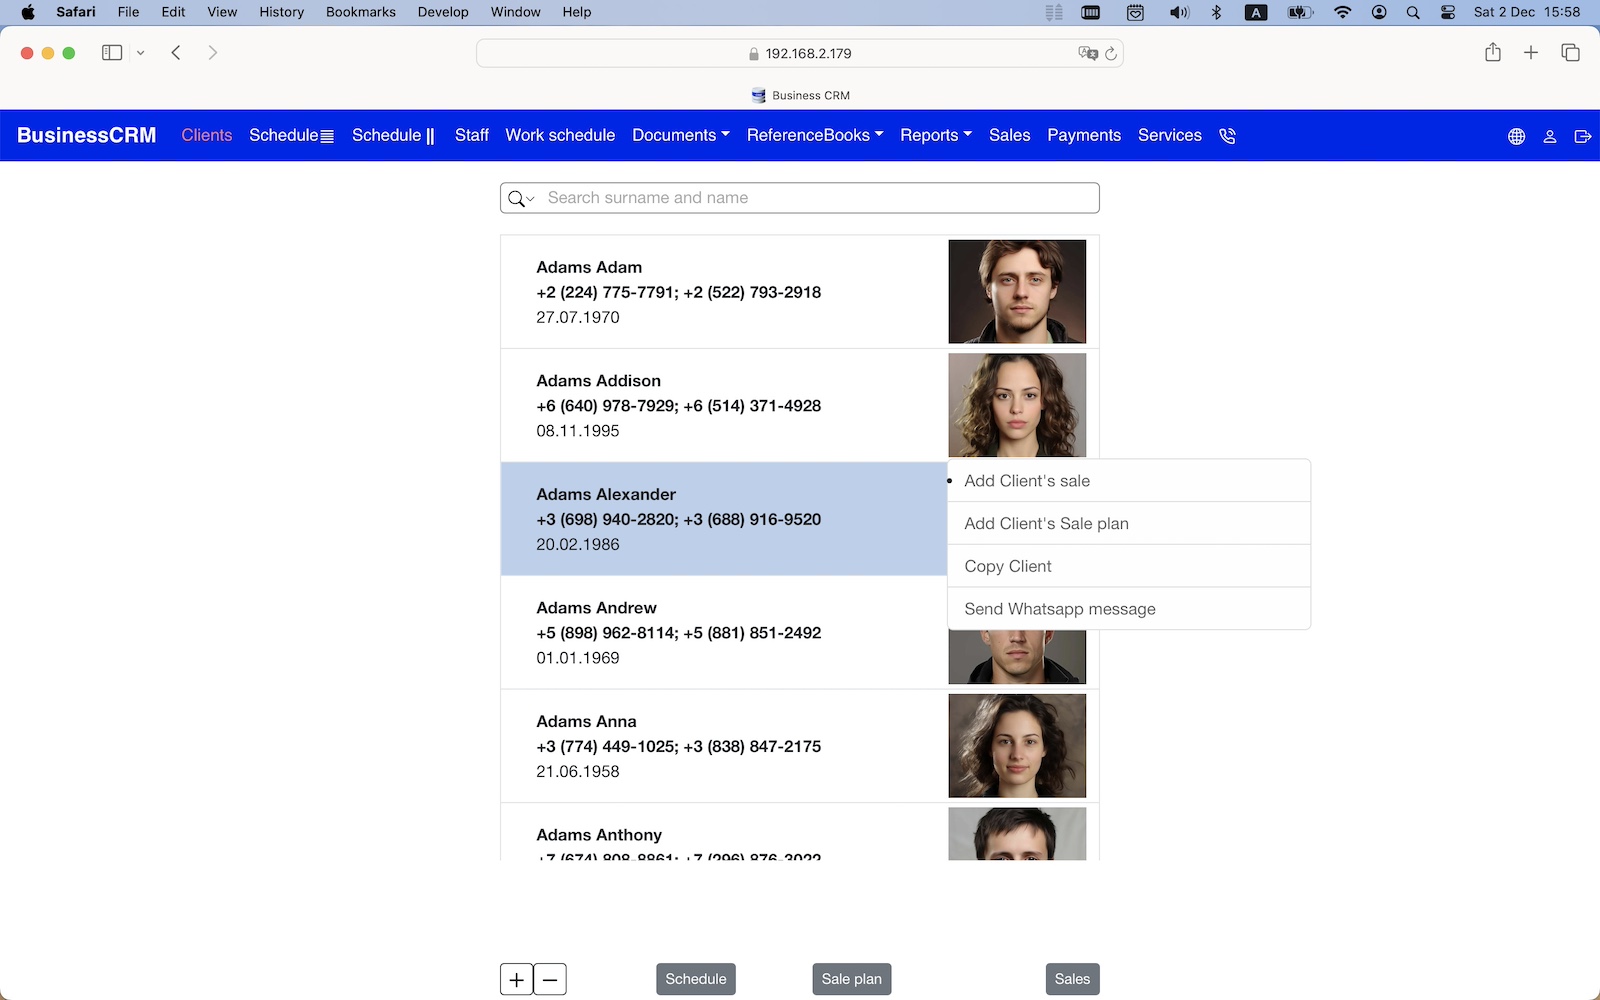
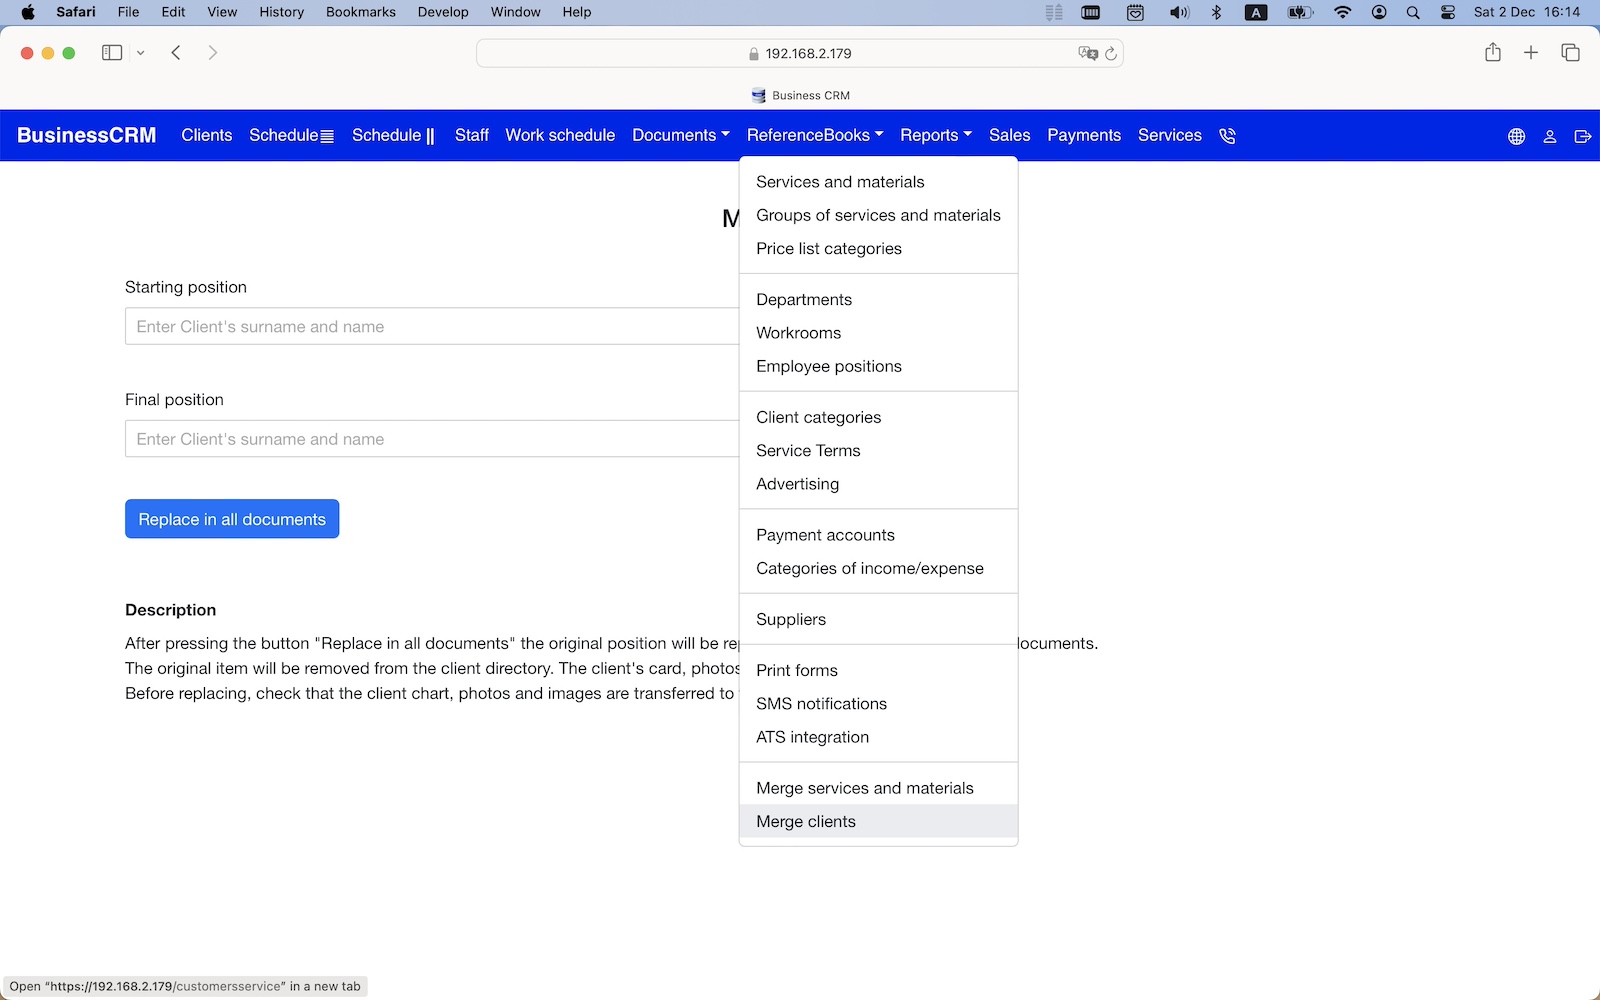
Creating a new client Click the "+" button to create a new client. Editing a client Double click on the selected client to edit a client. To save the changes, you should click the "Save" button. Pictures are saved immediately and do not depend on the "Save" button. MS Word document is saved immediately at the moment of saving using MS Word and do not depend on the "Save" button. Deleting a client Select a client and click the "-" button to delete the selected client. Default settings When you select the client in schedule or document, the default settings fill in the appropriate fields. Context menu To open the context menu, select the client and right-click. Actions To show all client records, select the client and click the "Schedule" button. To create a new "Sale" of client, select the client and click the "Sales" button. To create a new "Sale Plan" of client, select the client and click the "Sale Plan" button. Enter the client surname and/or name to the search field to find a client. Merge clients Use the "Merge clients" function if a duplicate client was created by mistake and documents were created for these clients.
|
|
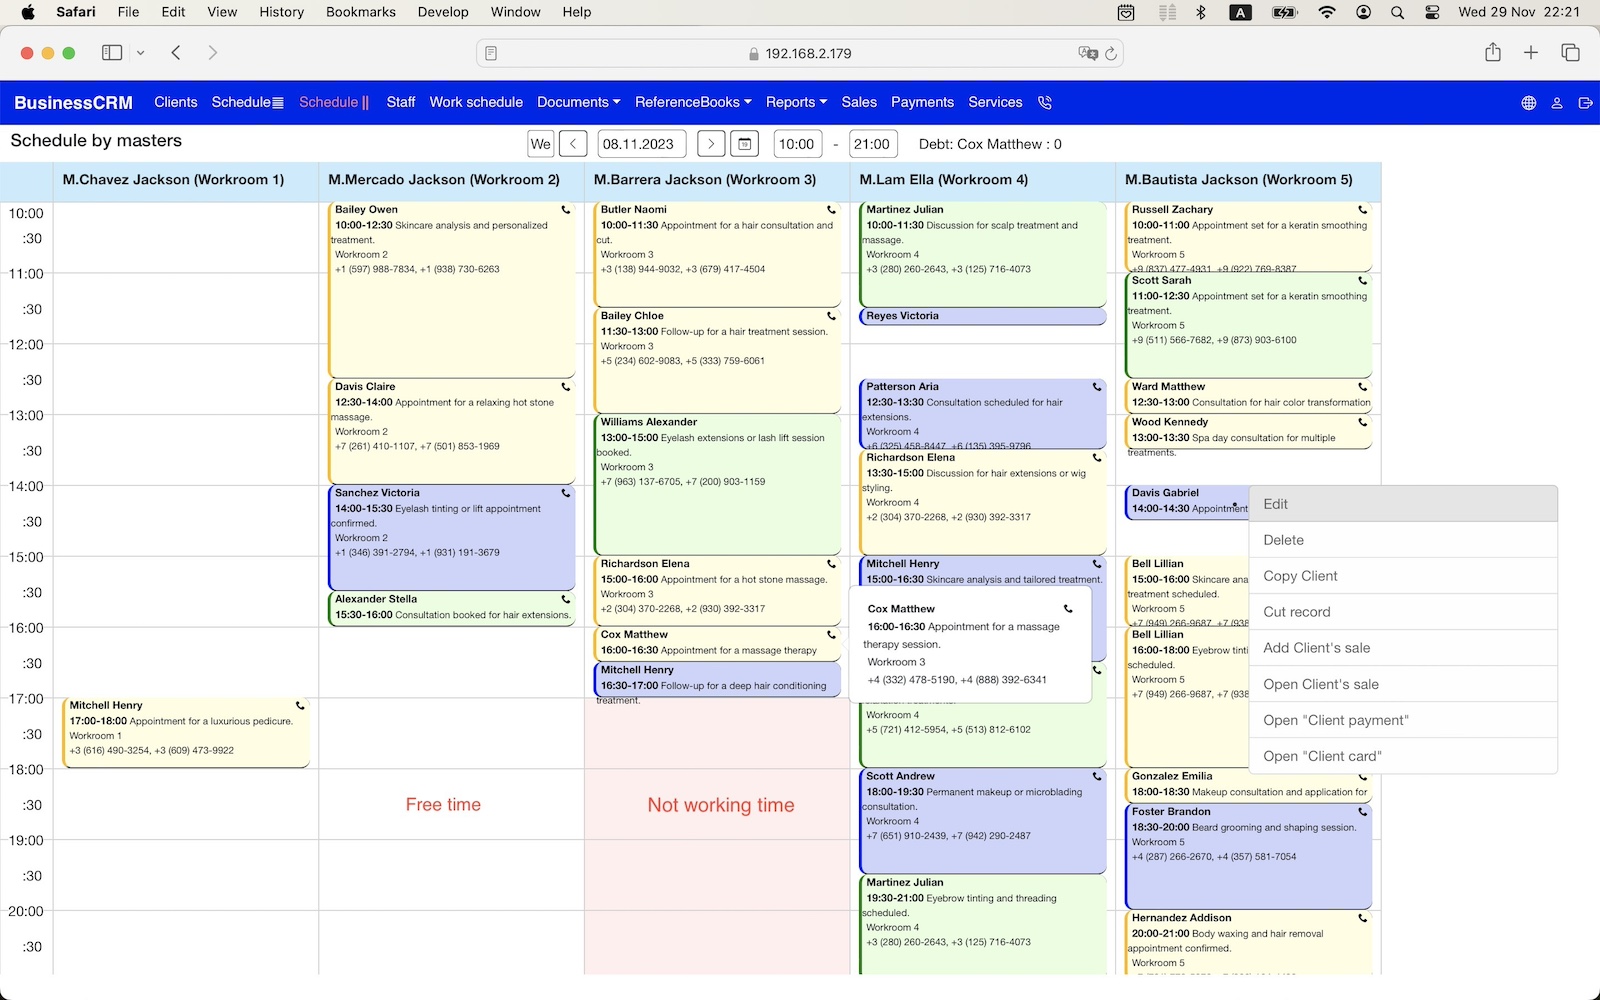
Schedule by masters
Creating a new record Right-click on the free time aria and select "Record copied client" or "Record for the selected time" to create a new record. You can copy client on the "Clients" tab or copy client from another record. Editing a record Right-click on the record and select "Edit" item to edit the record. Deleting a record Right-click on the record and select "Delete" item to delete the record. Context menu To open the context menu, select the record or the free time and right-click. Transferring a record to another time or anoter master. Change date, begin time and end time to transfer a record to another time. Change master to transfer a record to another master. You can "Cut record" and "Insert a previously cut record" using the context menu to transfer a record to another time or to anoter master. Also you can "Drag & Drop" the record to transfer a record to another time or to anoter master. Actions Click on a column title to make that column first. Click on a record to show all record information. Color indication of records Red - the client is late. Green - new client (no sales). Blue - the client hasn't been in for a long time (last sale more than 180 days).
|
|
Schedule
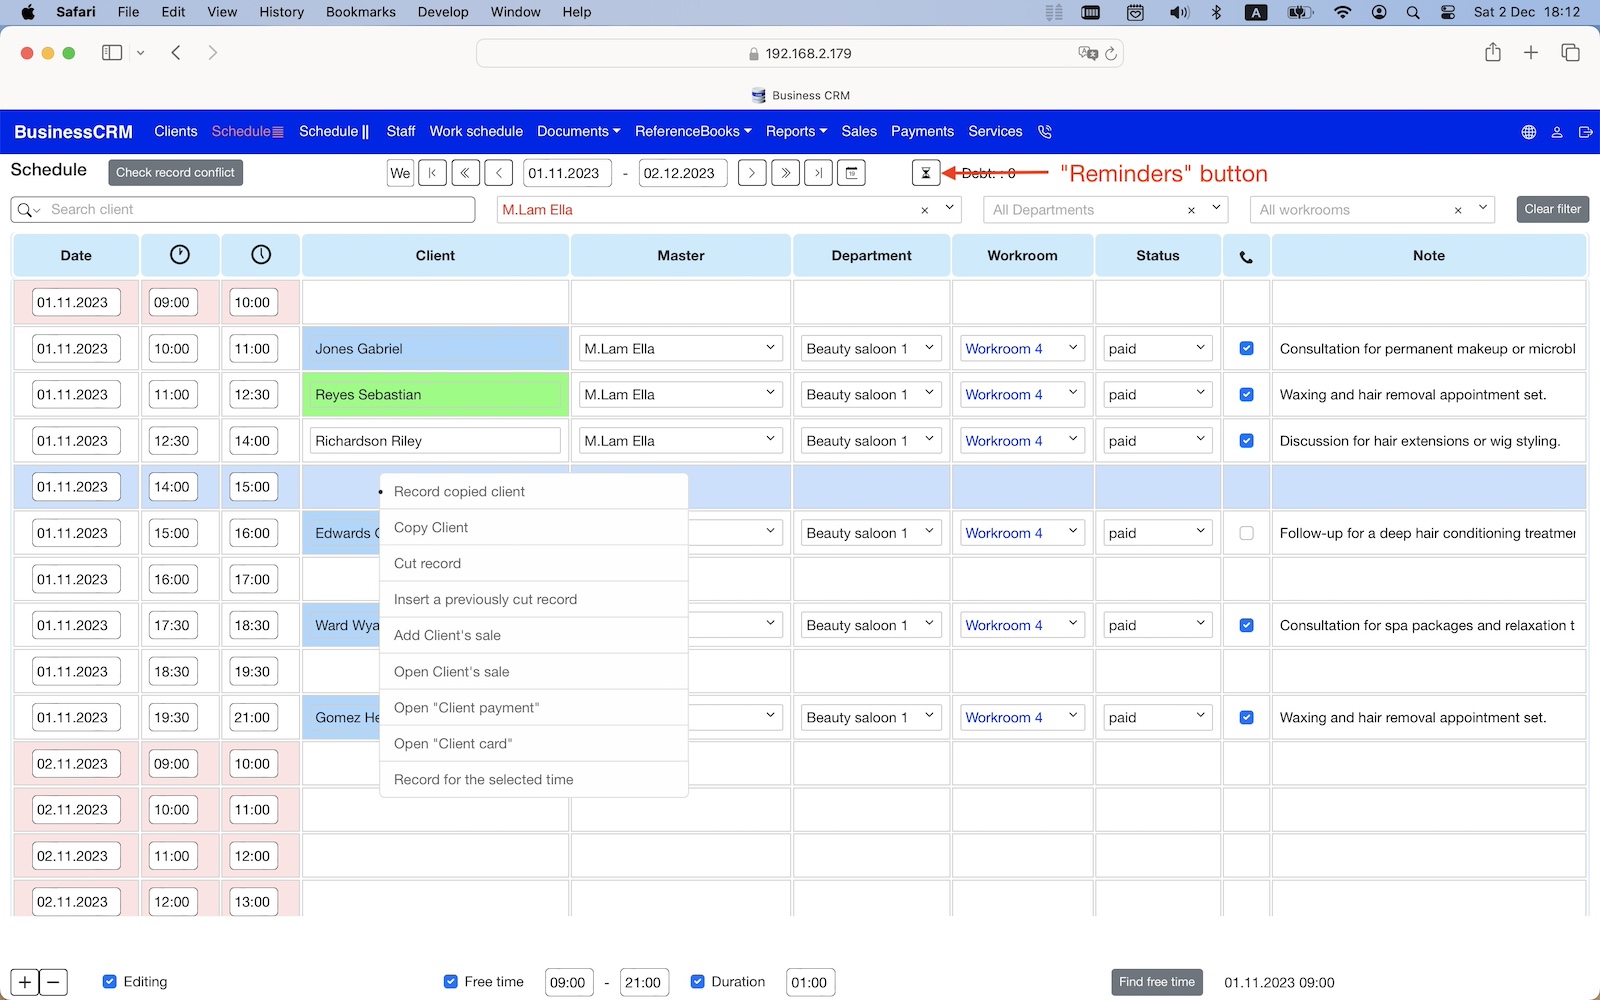
Displaying free time in the schedule Select a master to show records of only the selected master. Enable "Free time" mode. Creating a new record Select free time and click the "+" button to create a new record. Enter surname and name of the client. Right-click on the free time aria and select "Record copied client" or "Record for the selected time" to create a new record. You can copy client on the "Clients" tab or copy client from another record. Editing a record Enable "Editing" mode to edit records. Deleting a record Select a record and click the "-" button to delete the selected record. Context menu To open the context menu, select the record or the free time and right-click. Actions To show only "reminders", click the "Reminders" button. SMS notifications are not sent for records with the "Reminder" status. You should select a master to use "Find free time" function. Click "Check record conflict" button to find the records conflict by workrooms and masters for selected period. Click "Clear filter" button to show all records for selected period. Select the master to show all master's records for selected period. Insert the client surname and name to the search field to show client's records for selected period. Color indication of records Red - the client is late. Green - new client (no sales). Blue - the client hasn't been in for a long time (last sale more than 180 days). Transferring a record to another time Change date, begin time and end time to transfer a record to another time. Also you can "Cut record" and "Insert a previously cut record" using the context menu to transfer a record to another time.
|
|
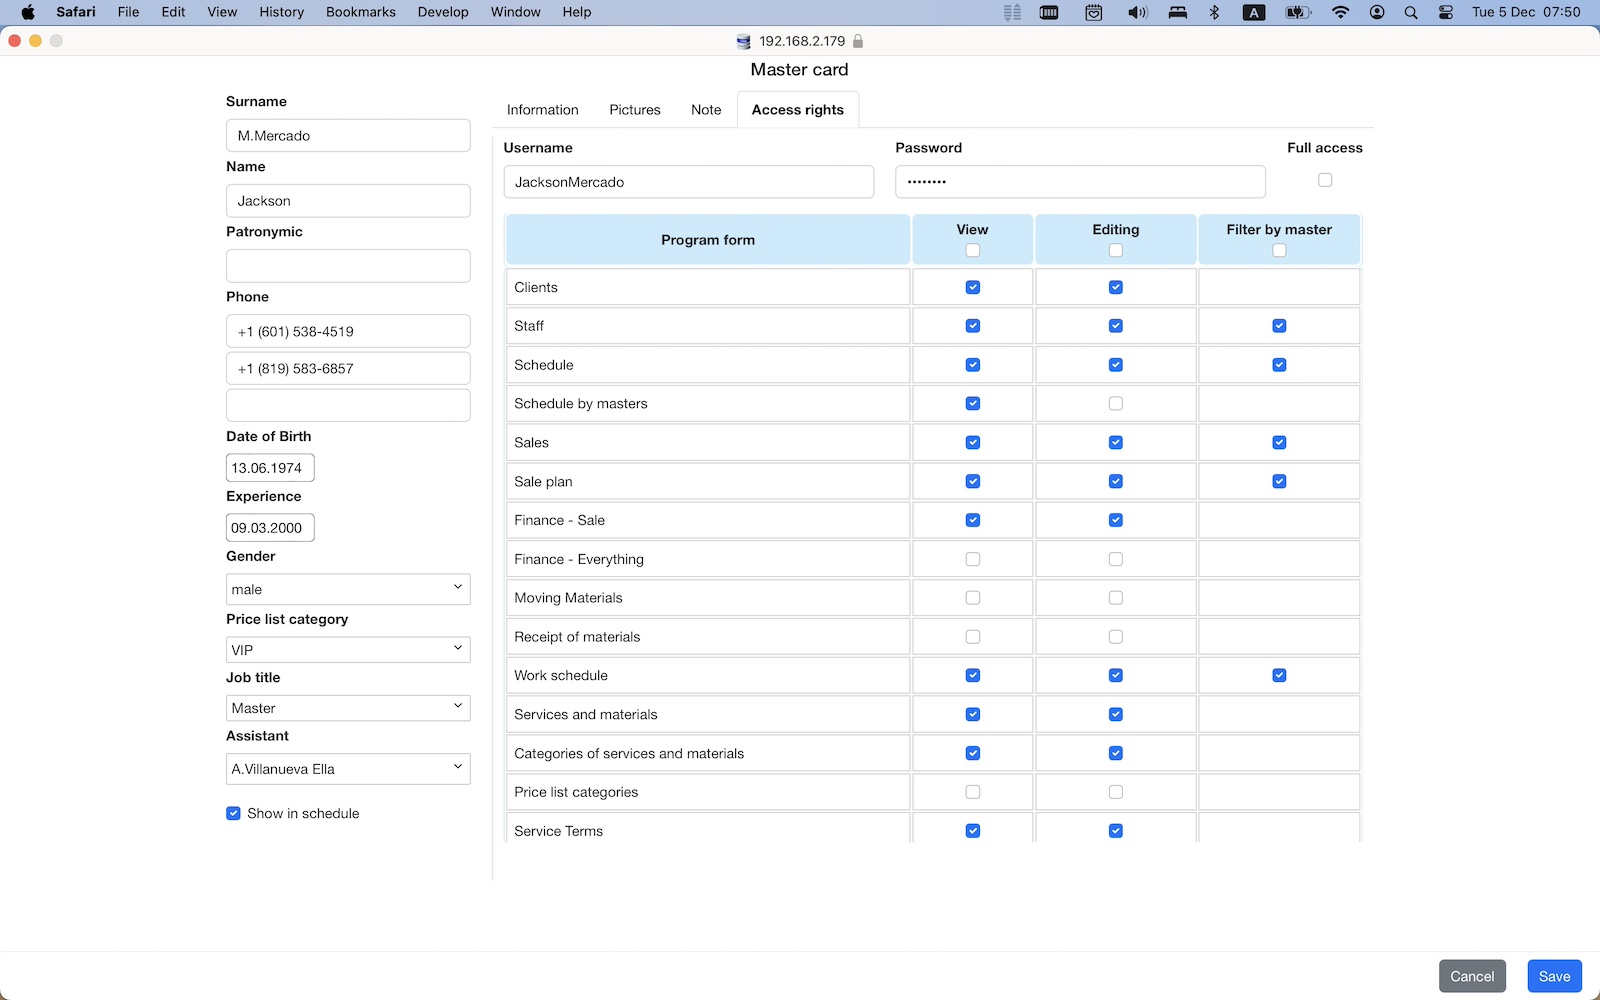
Staff
Creating a new employee Click the "+" button to create a new employee. Editing an employee To save the changes, you should click the "Save" button. Pictures are saved immediately and do not depend on the "Save" button. Deleting an employee Select an employee and click the "-" button to delete the selected employee. Default settings When you select the master in schedule or document, the default settings fill in the appropriate fields. Access rights Each employee can work in the app under their own login. Set a filter by master so that the master has access only to documents related to his clients. Actions Enter the employee surname and/or name to the search field to find an employee.
|
|
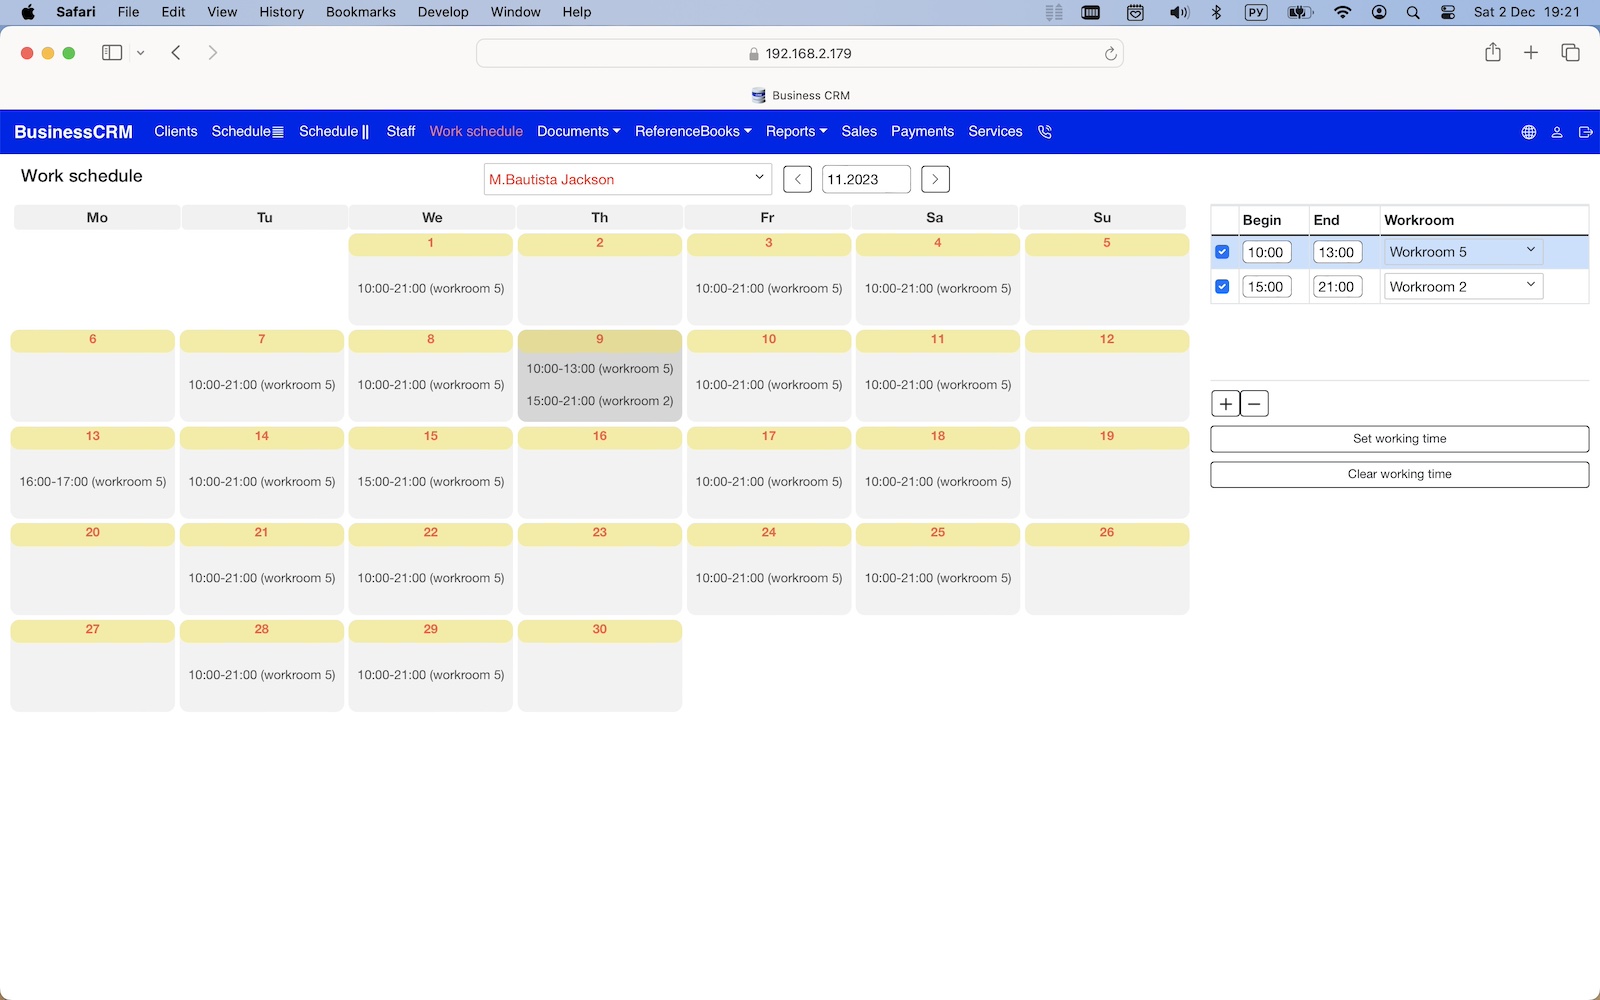
Work Schedule
Description You should set the working hours of the masters for the correct generation of reports and the correct display of free time in the schedule. Set "working time" Before setting working time, you should select a master and create a list of workroom usage (table on the right). Select days in the schedule and click the "Set working time" button. Use the "command" key to select multiple days. Also you can click on the column name to select all days of selected column. Clear "working time" Select days in the schedule and click the "Clear working time" button.
|
|
Documents
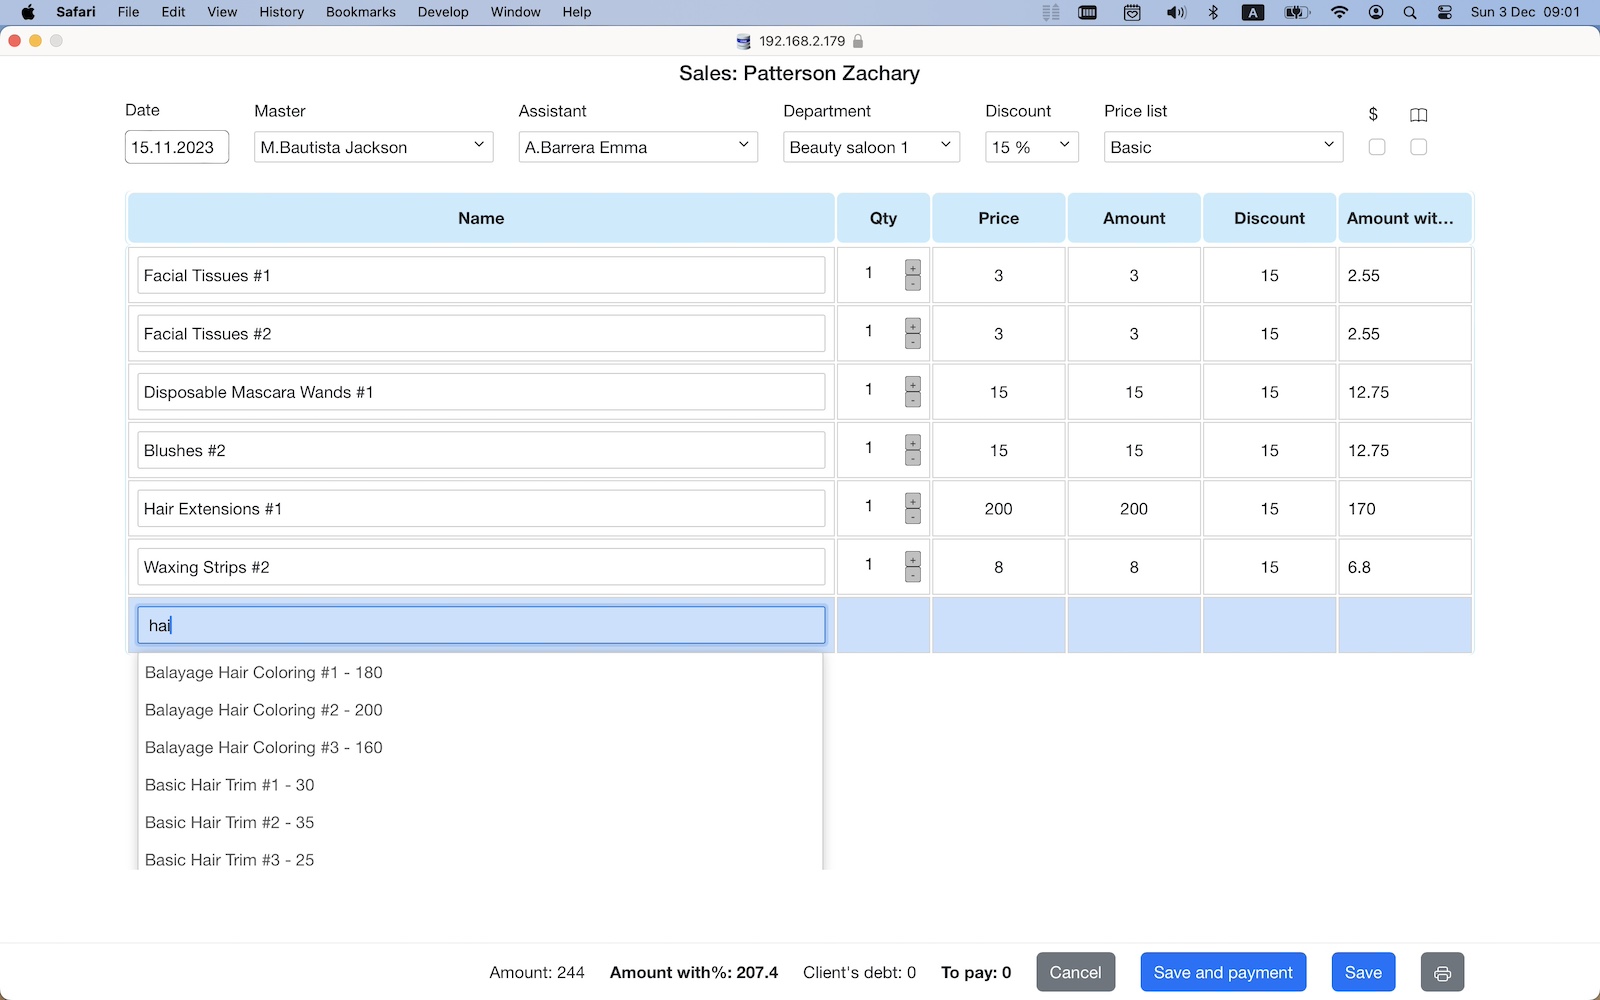
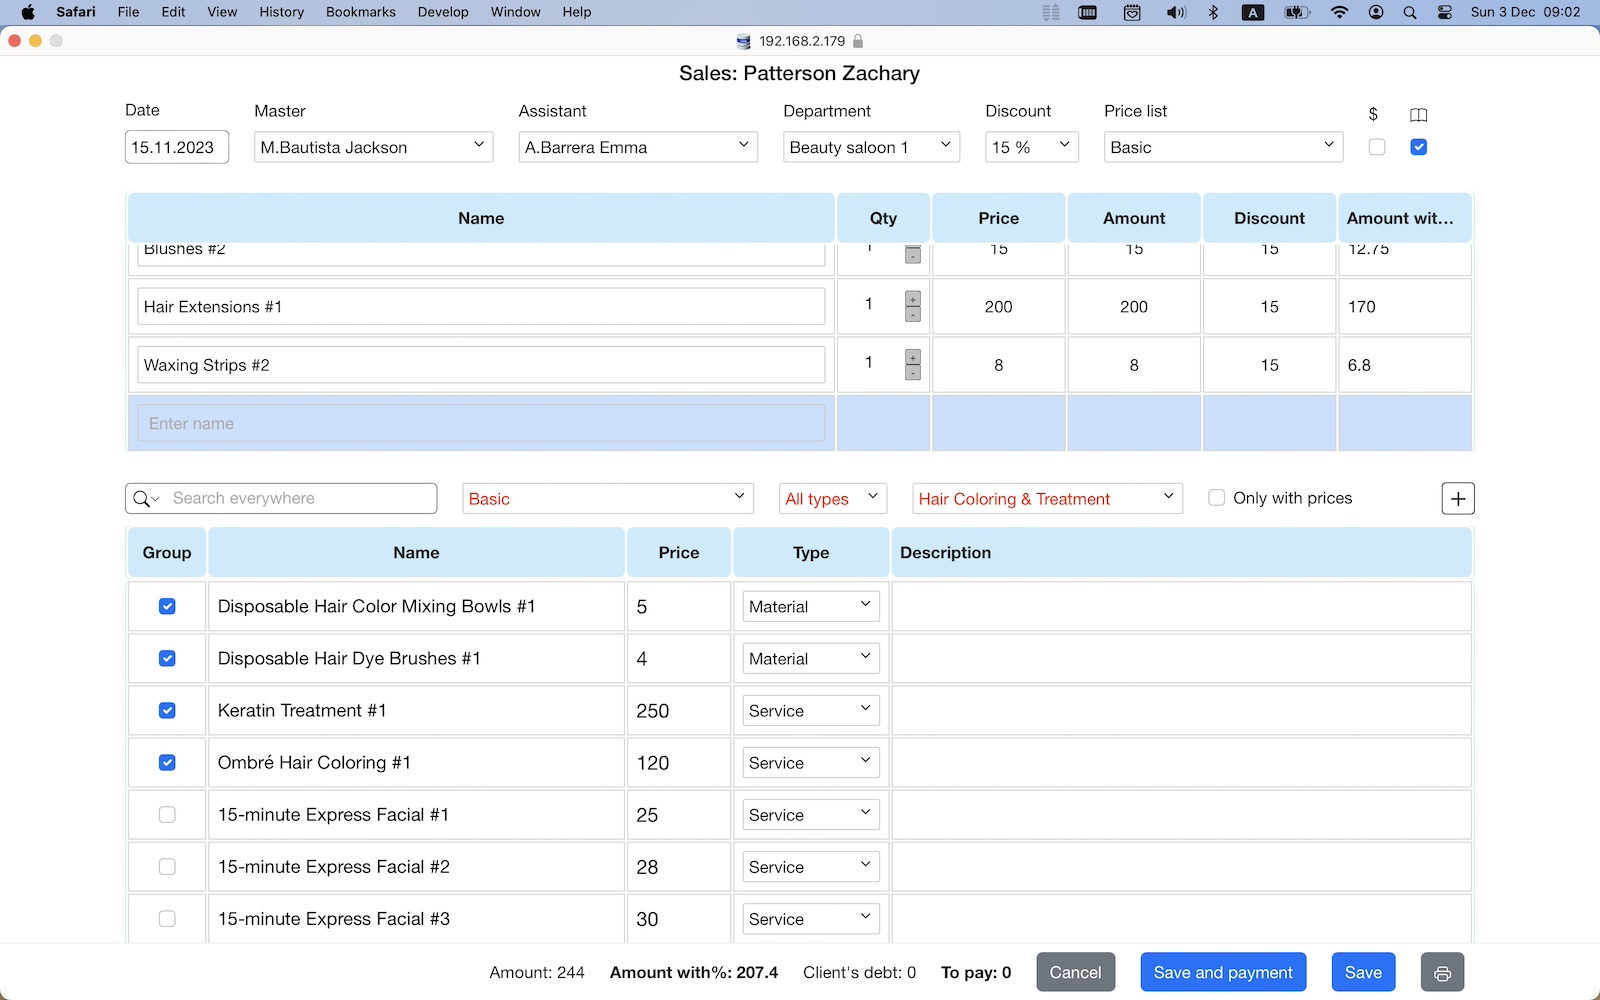
Creating a new document Click the "+" button on the "Sales" tab or select the client and click the "Sales" button on the "Clients" tab to create a new sale. Click the "+" button on the "Sale Plan" tab or select the client and click the "Sale Plan" button on the "Clients" tab to create a new sale plan. Editing a document Double click on the selected document to edit a document. Adding services and materials to a document Start typing the name of the service or material to add a new service or material to document. Enter "group" to add multiple services or materials to the document that match the selected group. Turn on the "Reference book" mode to display a reference book of services and materials. Double click on the selected services and materials of the reference book to add services and materials or services and materials group to document. Turn on the "$" mode to display a list of services and materials with prices only. Deleting a document Select a document and click the "-" button to delete the selected document.
|
|
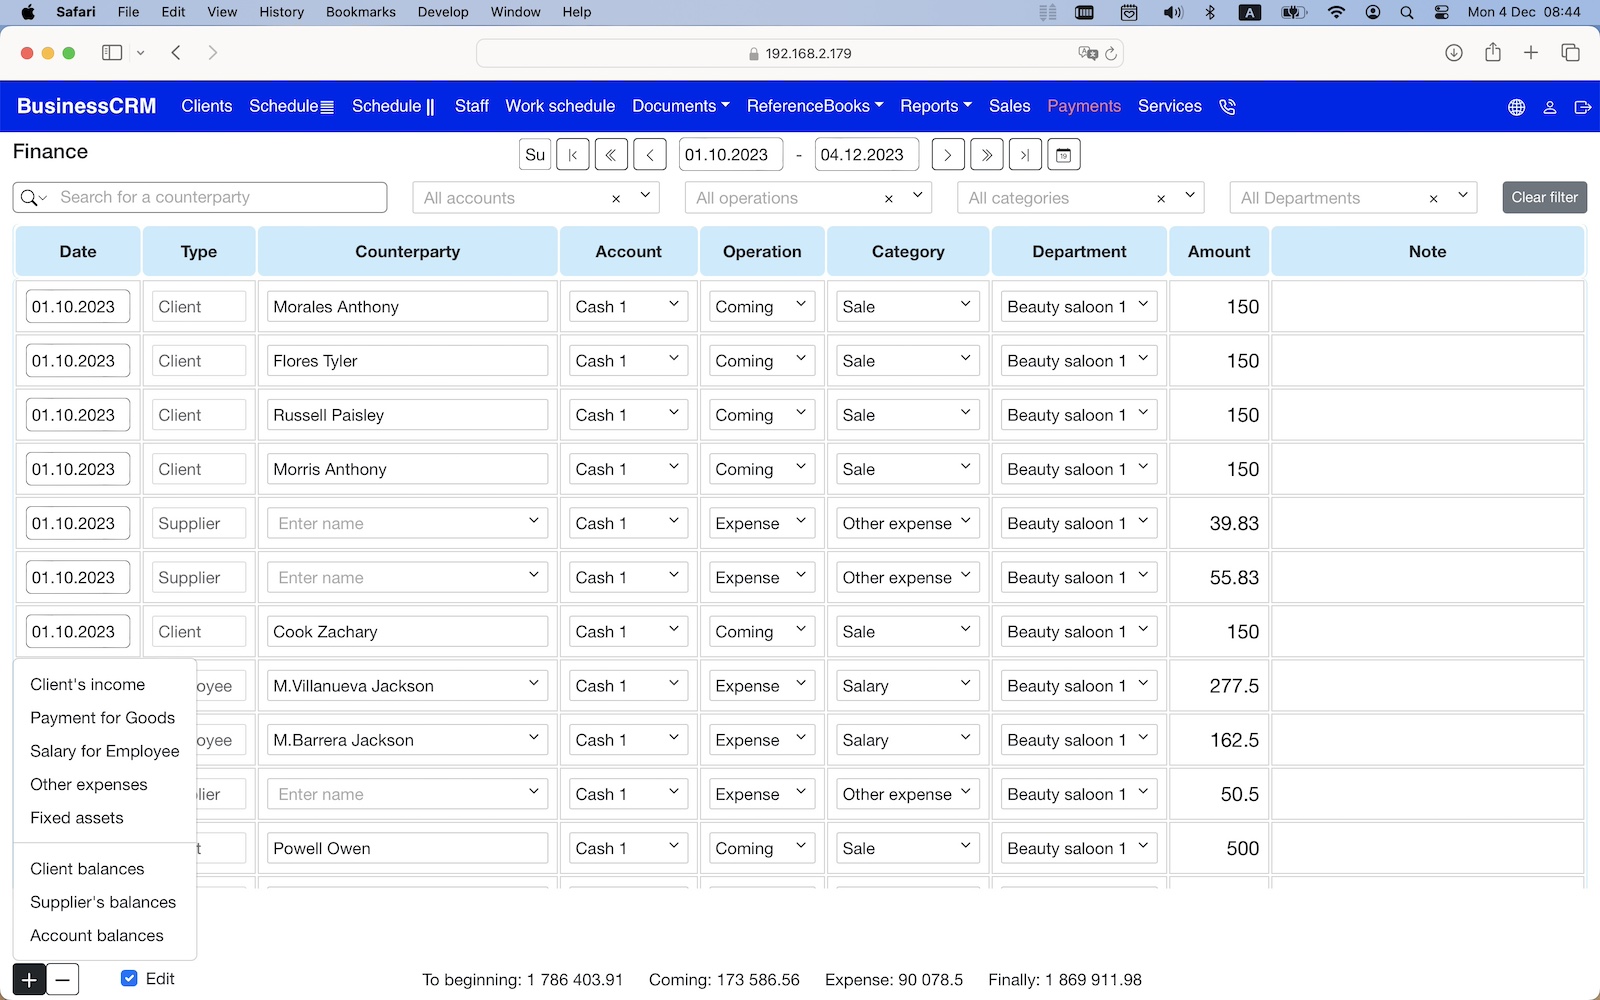
Finance
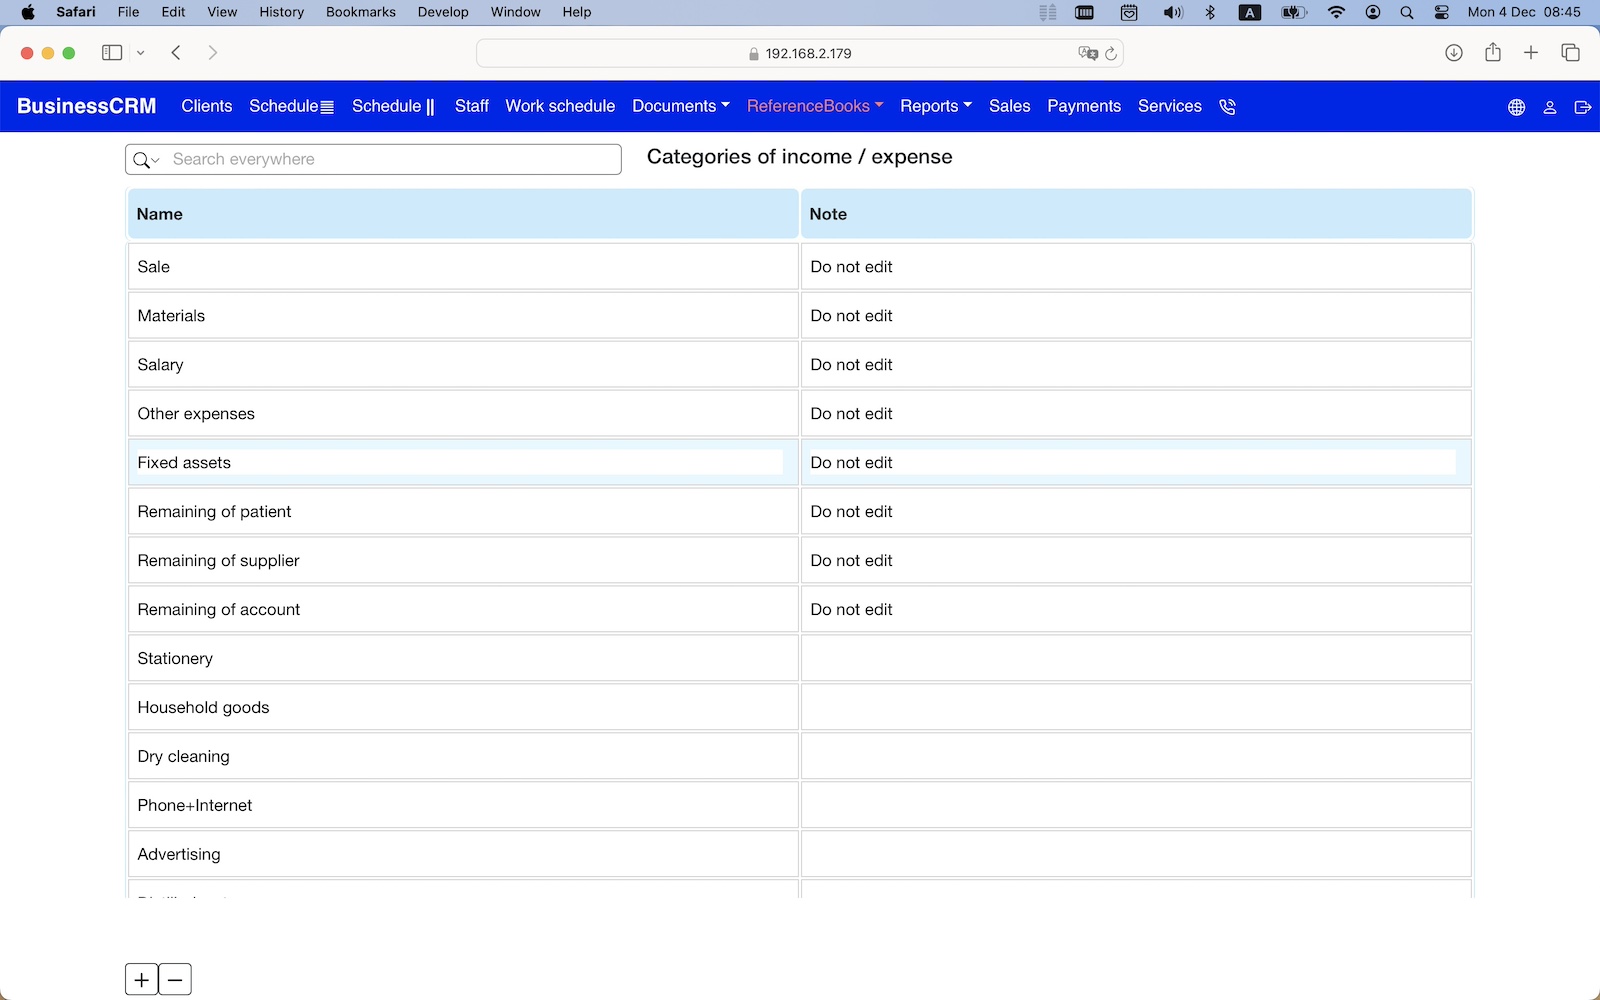
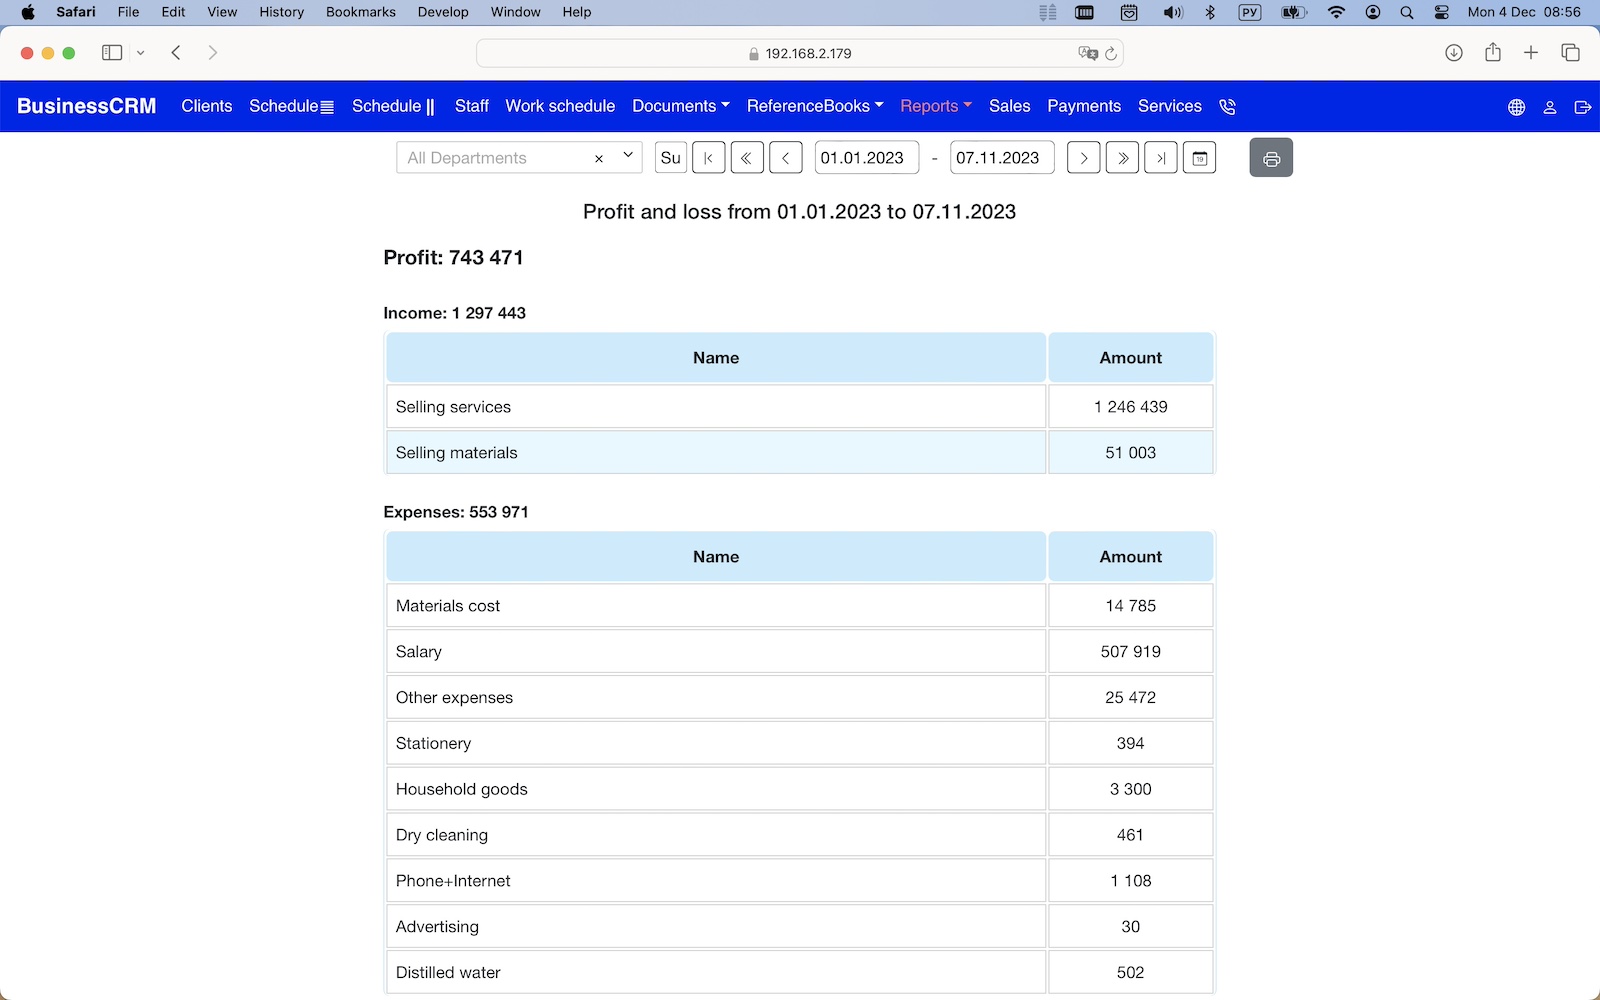
Description You should create a reference book of income and expenses before entering financial transactions. You can create any number of income and expense items in the reference book. All items of income and expenses will be reflected in the profit and loss report. Enter all balances before starting financial accounting:
Profit calculation Income:
Expenses:
Creating a new financial transaction Click the "+" button to create a new record. Select the type of financial transaction from the list. You can change the income or expense item if you need after creation. Also, a financial transaction can be created from the "Sale", "Sale plan", "Receipt of materials". All attributes of the financial transaction will be filled in automatically. Editing a financial transaction Enable "Editing" mode to edit the financial transactions. Deleting a financial transaction Select a financial transaction and click the "-" button to delete the selected financial transaction. Context menu To open the context menu, select the financial transaction and right-click. When you click "Add client payment", the app will automatically calculate the client's debt and create a financial transaction for this amount. This is required when the client makes payment to different bank accounts.
|
|
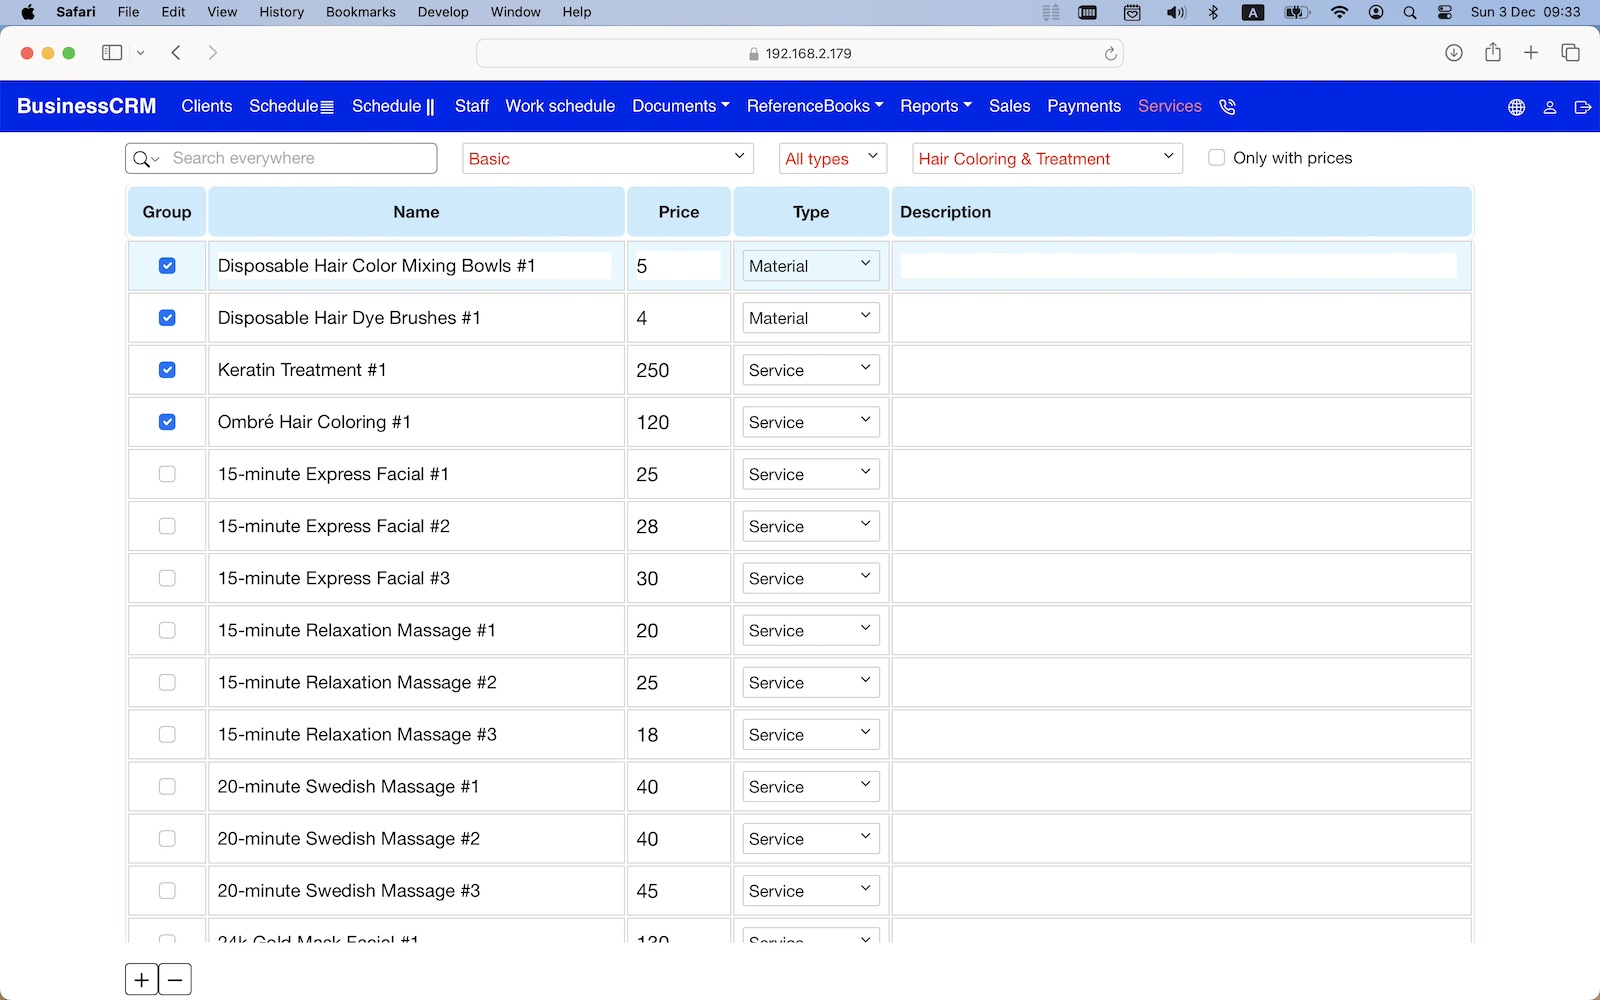
Services and Materials
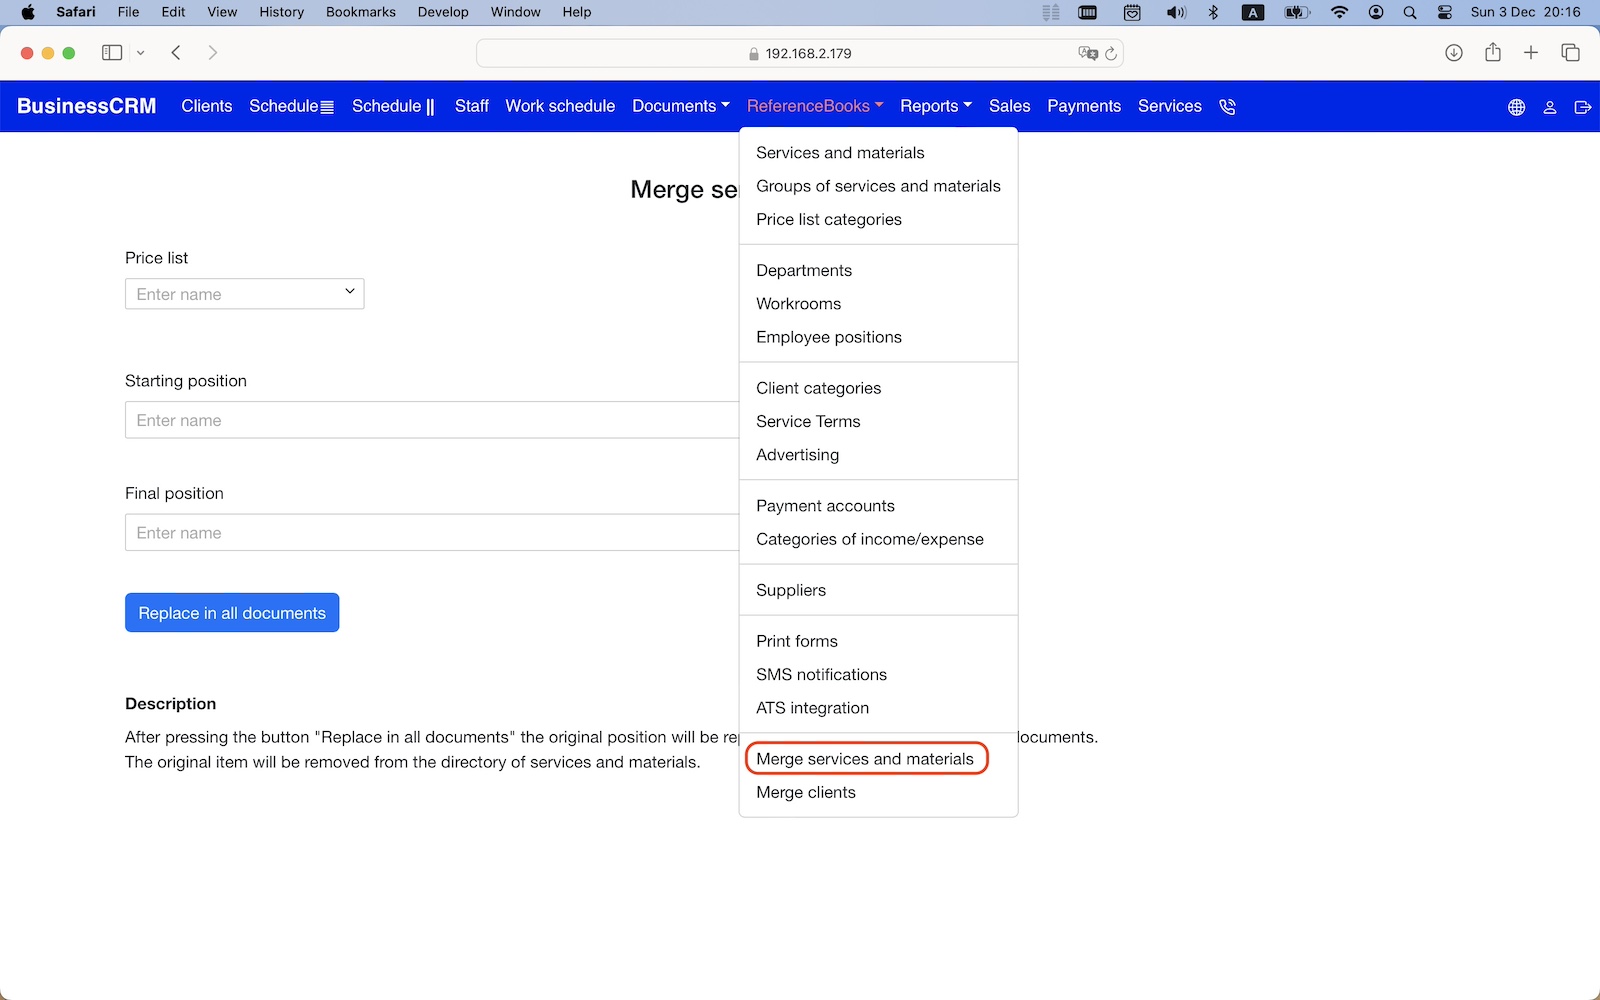
Creating a new item Click the "+" button to create a new item. Deleting an item Select an item and click the "-" button to delete the selected item. Adding items to the item group Select the item group. Select an item and enable "group" to add item to the group. Adding items to the price list Select the price list. Select an item and enter the price for the selected price list. Merge services and materials Use the "Merge services and materials" function if a duplicate item was created by mistake and documents were created for these items.
|
|
Reference book
Description You should complete all reference books before creating documents and schedule records. For example, before creating services and materials reference book, you need to fill out the reference books: "Groups of services and materials", "Price list categories". Creating a new item Click the "+" button to create a new item. Deleting an item Select an item and click the "-" button to delete the selected item.
|
|
Print Forms
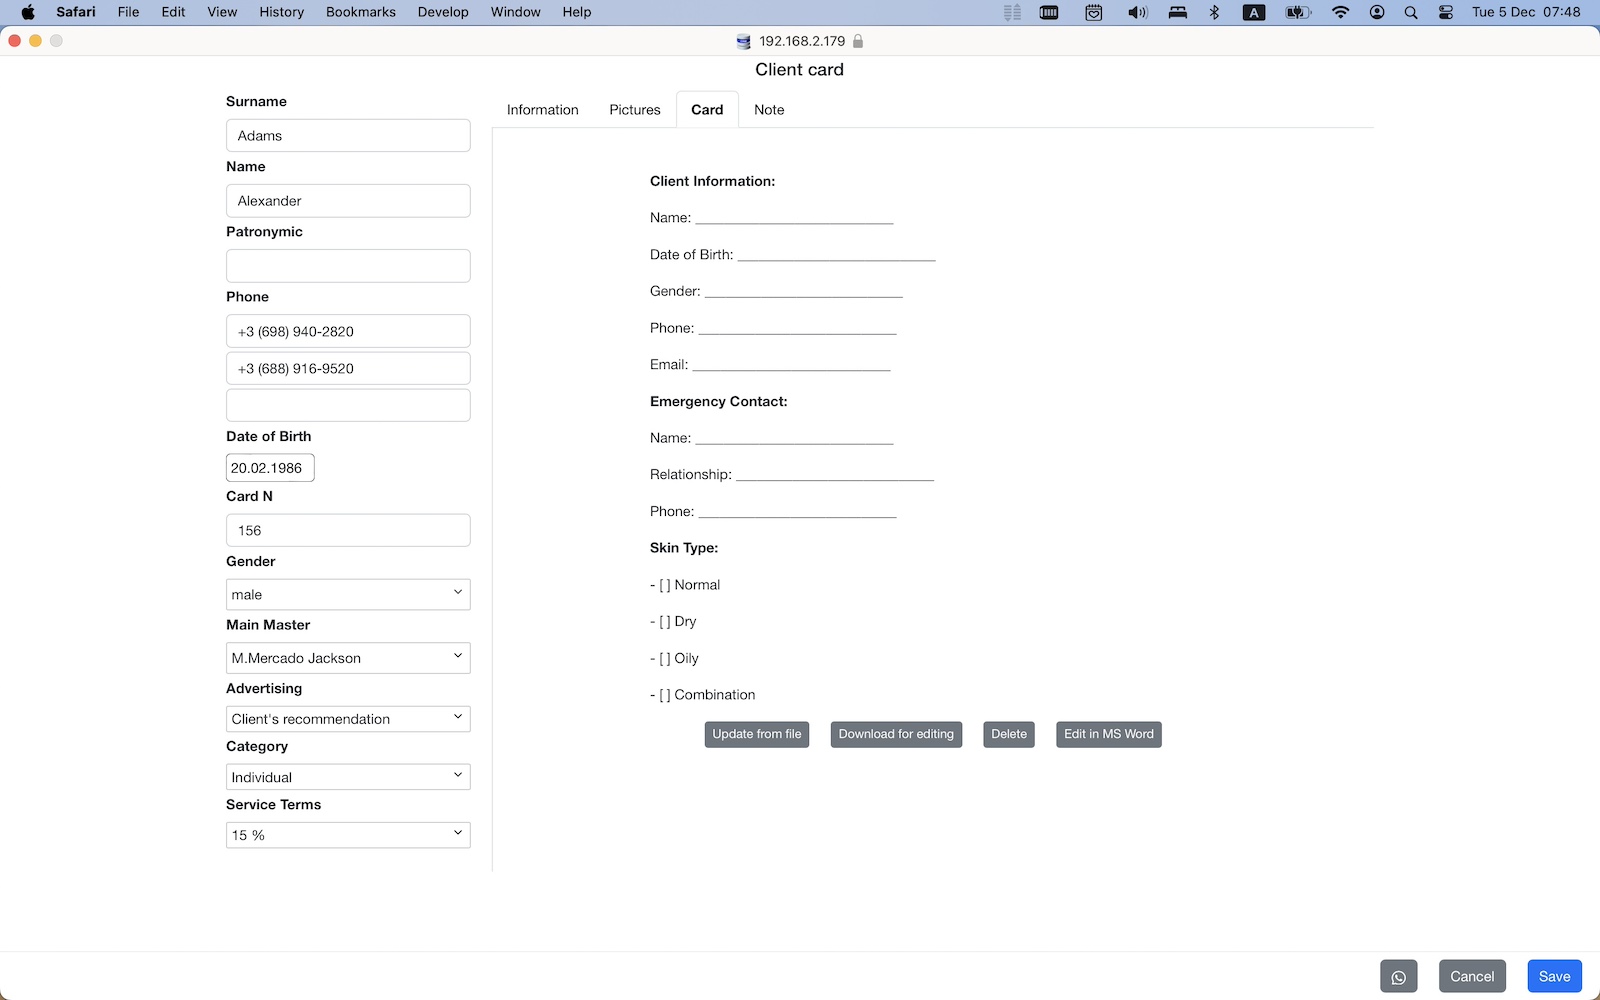
Description You can create your own print forms in html format. You can create your own default customer card in MS Word format. This card will be added when creating a new client.
|
|
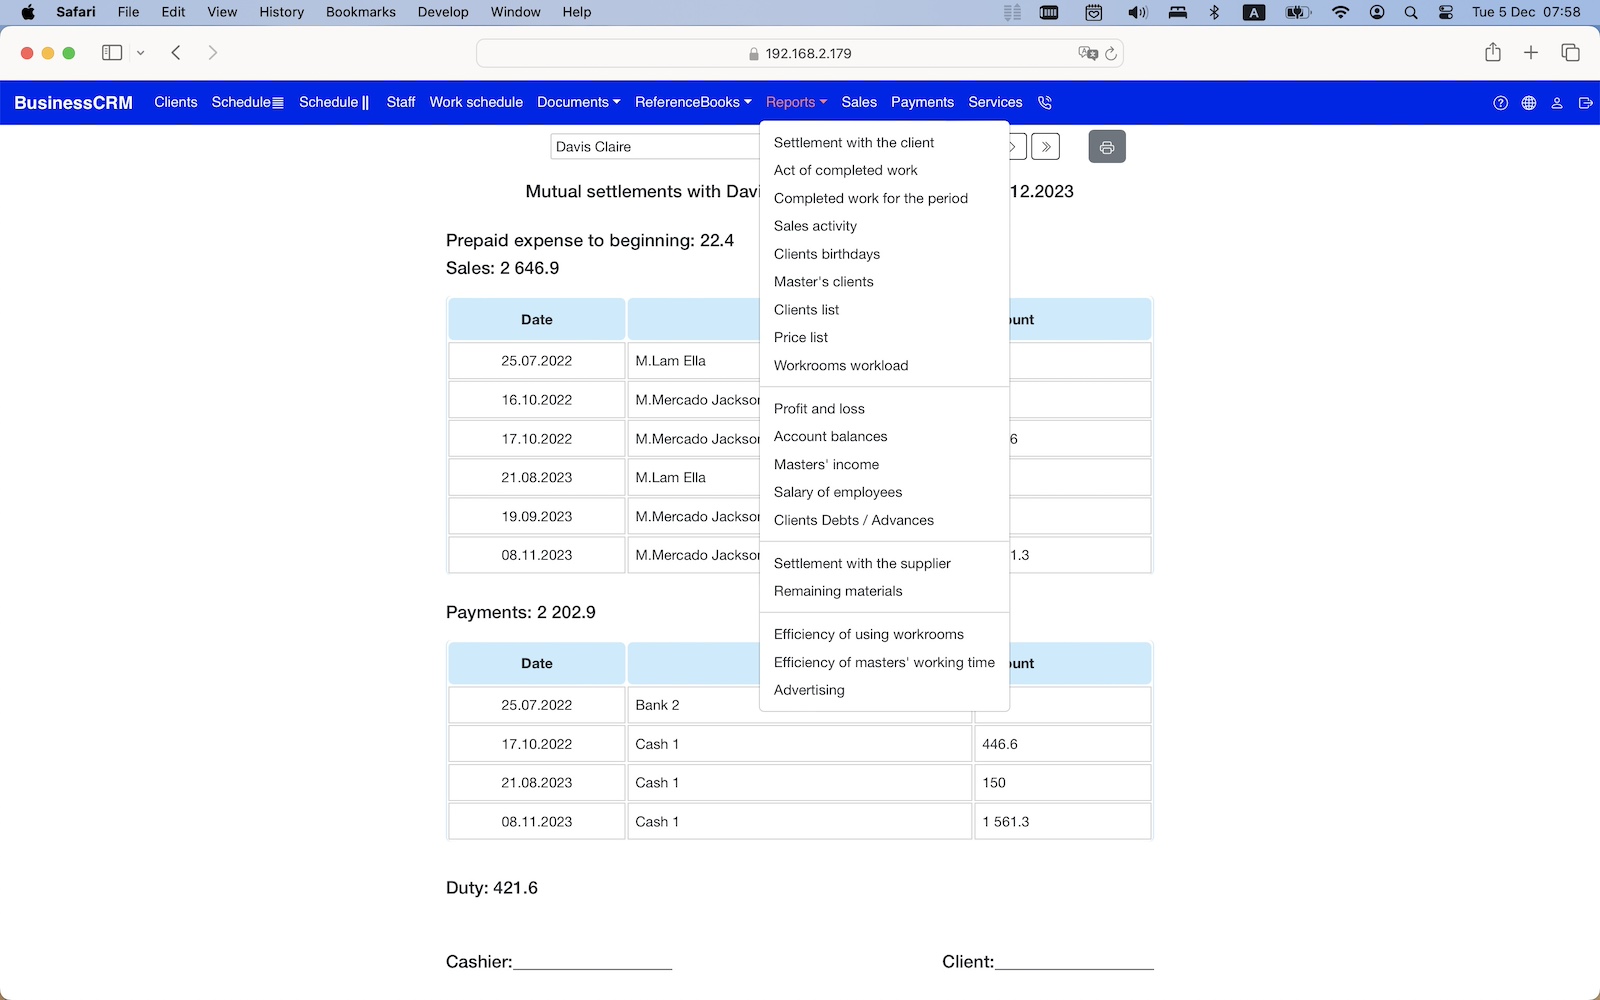
Reports
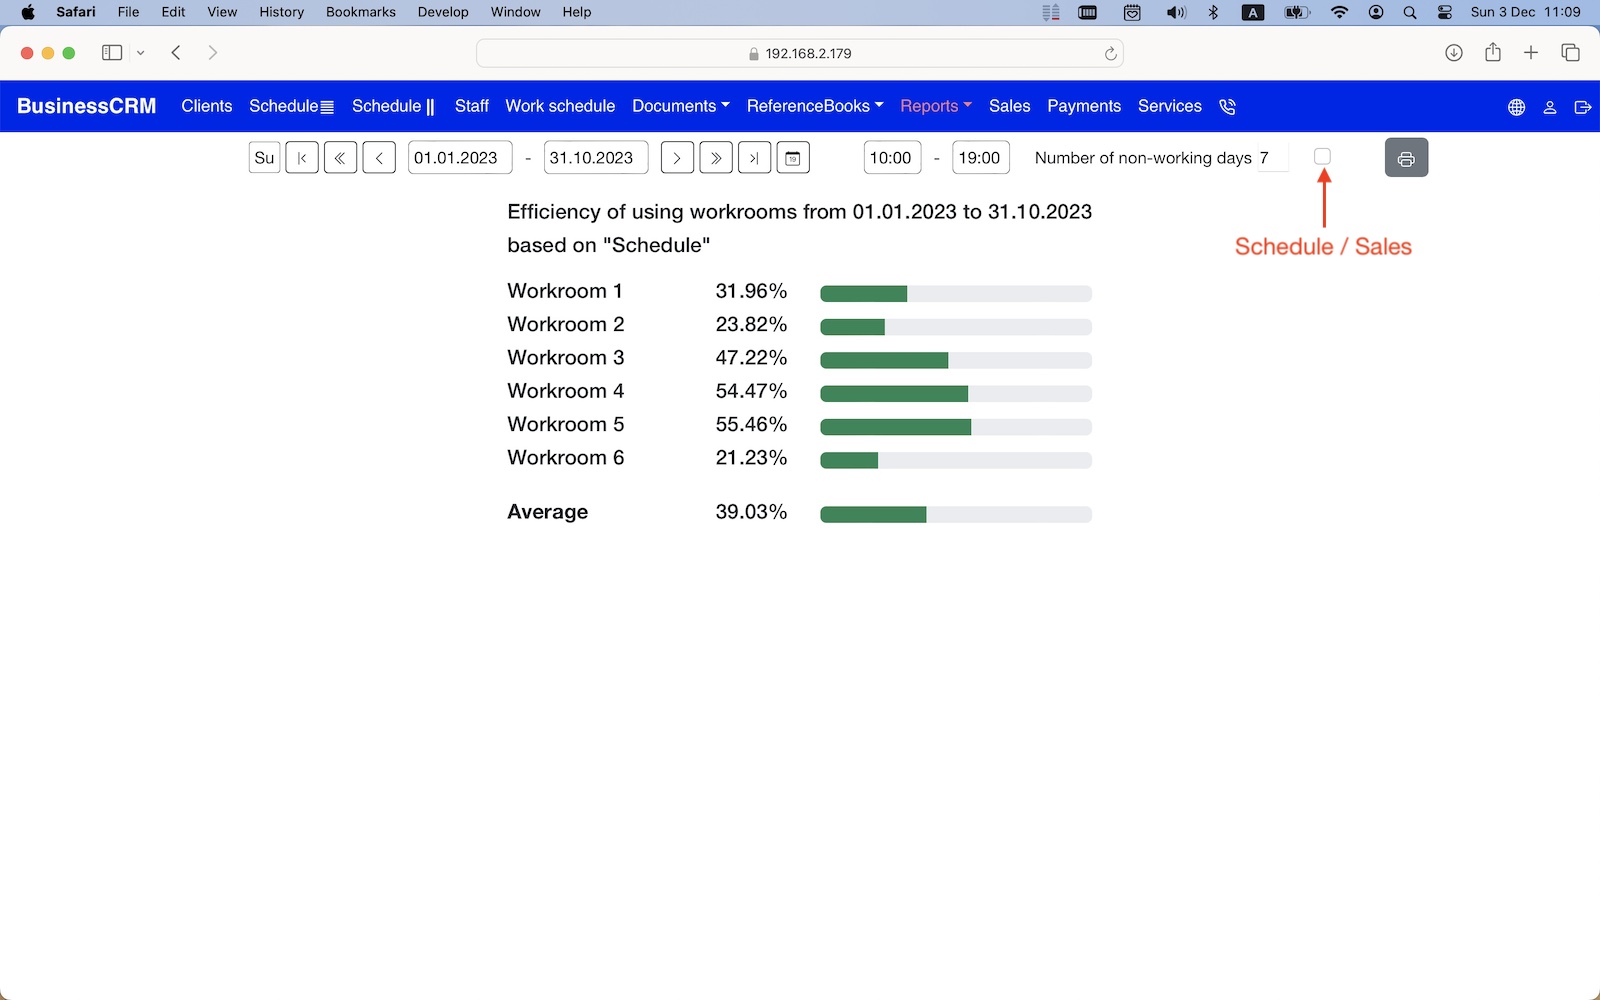
Description To correctly generate the "Masters' income" report, it is necessary to assign expenses to a specific master associated with the work of this master (when creating a financial transaction, the counterparty must a master). You can create "Efficiency of using workrooms" and "Efficient use of working time" reports using schedule records or sales records.
|
|
Incoming client call
Description To receive incoming calls from clients, you need to enable the “Receive incoming calls” mode and configure your ATS. The caller card allows you to quickly open / create a client card, display schedule records and sales for this client. The caller card can be displayed on any tab and form.
|
|
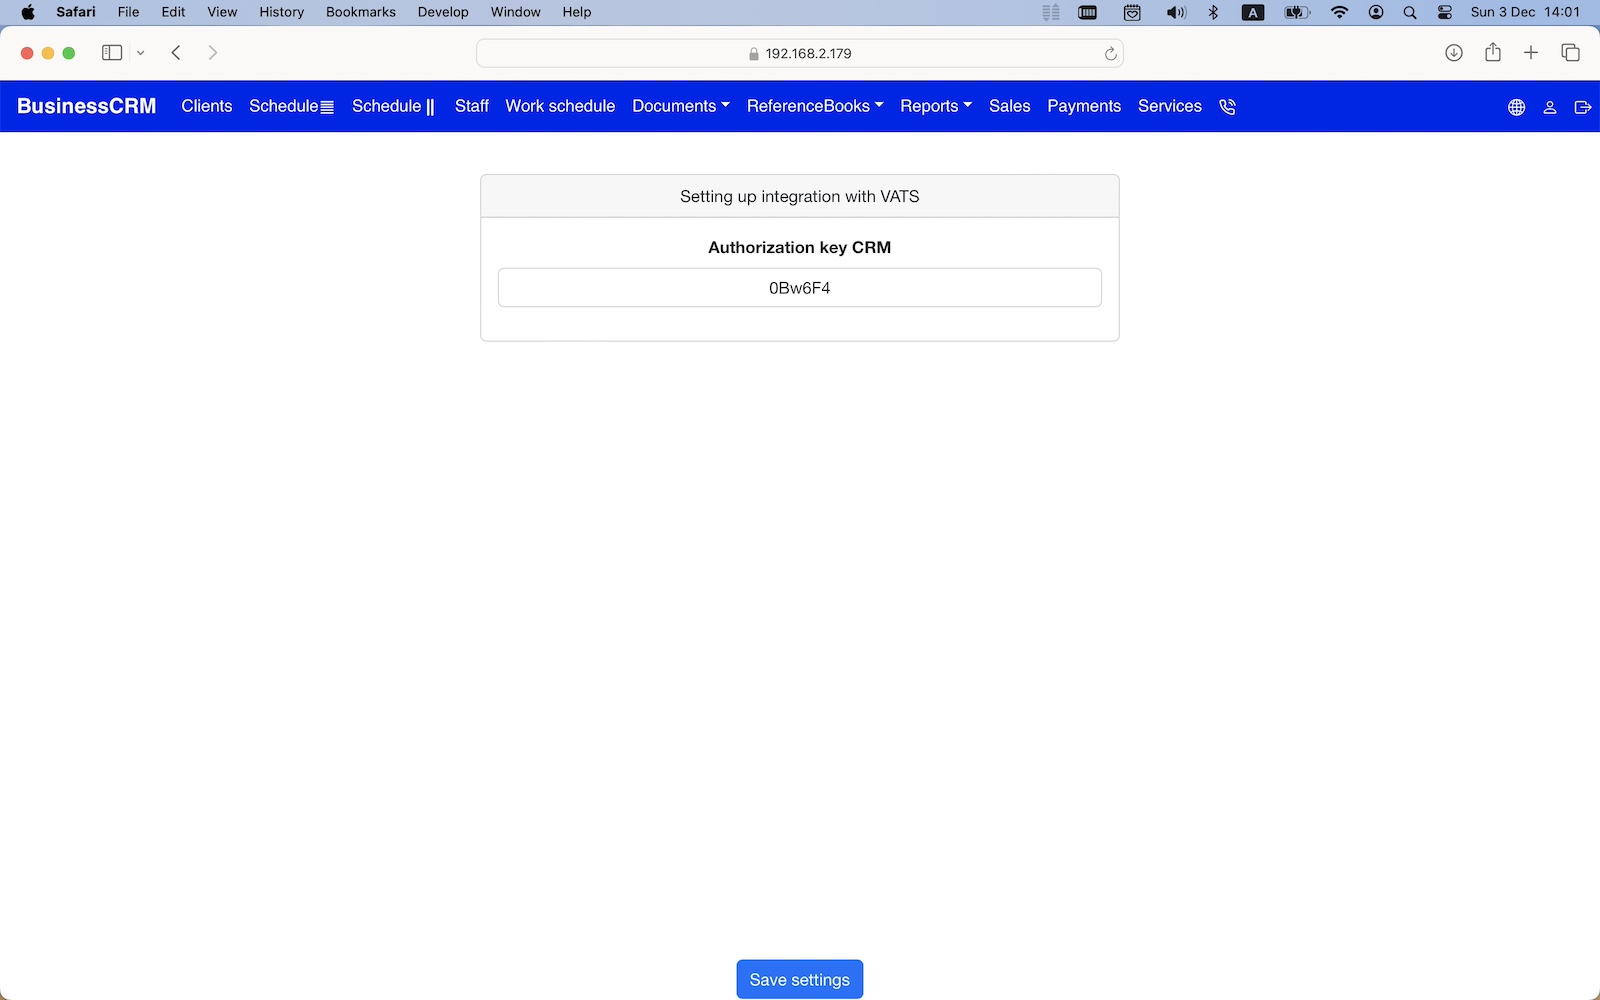
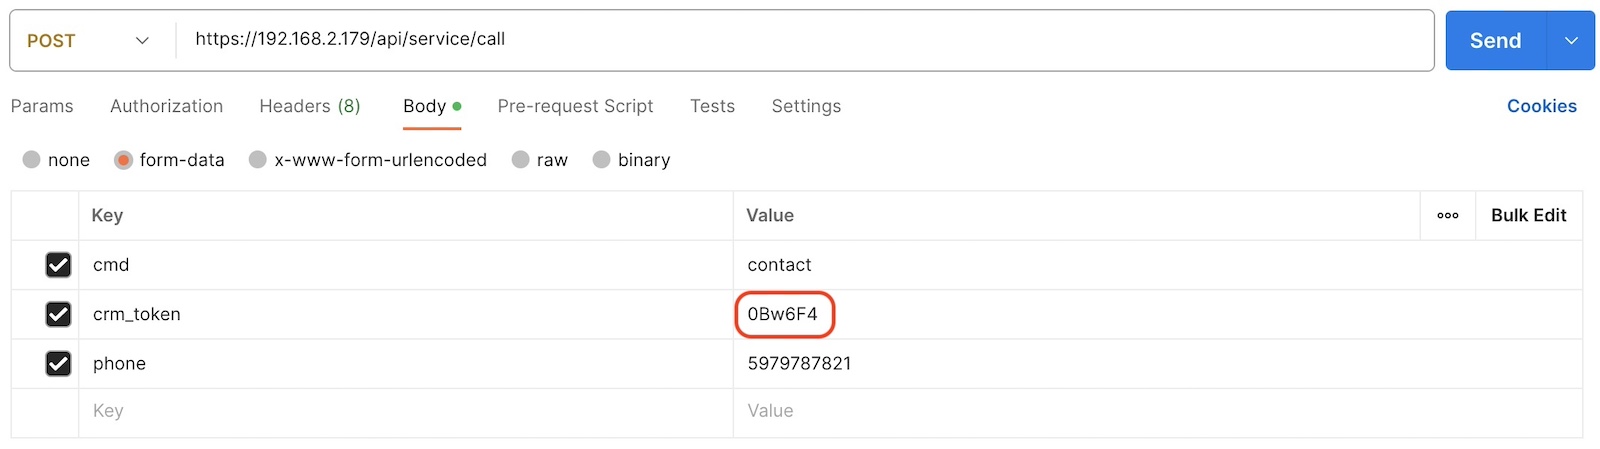
ATS Integration
To integrate with the ATS, remote access to the app via the Internet must be configured. Settings in the app:
Setting up ATS on the provider side:
You should change the "PublicIP" to your public IP or domain name. You can change the "Authorization key CRM", but the key must be the same in the app and in the ATS setup on the provider’s side. Requirements for ATS:
Contact us if you need http request with other parameters.
|
|
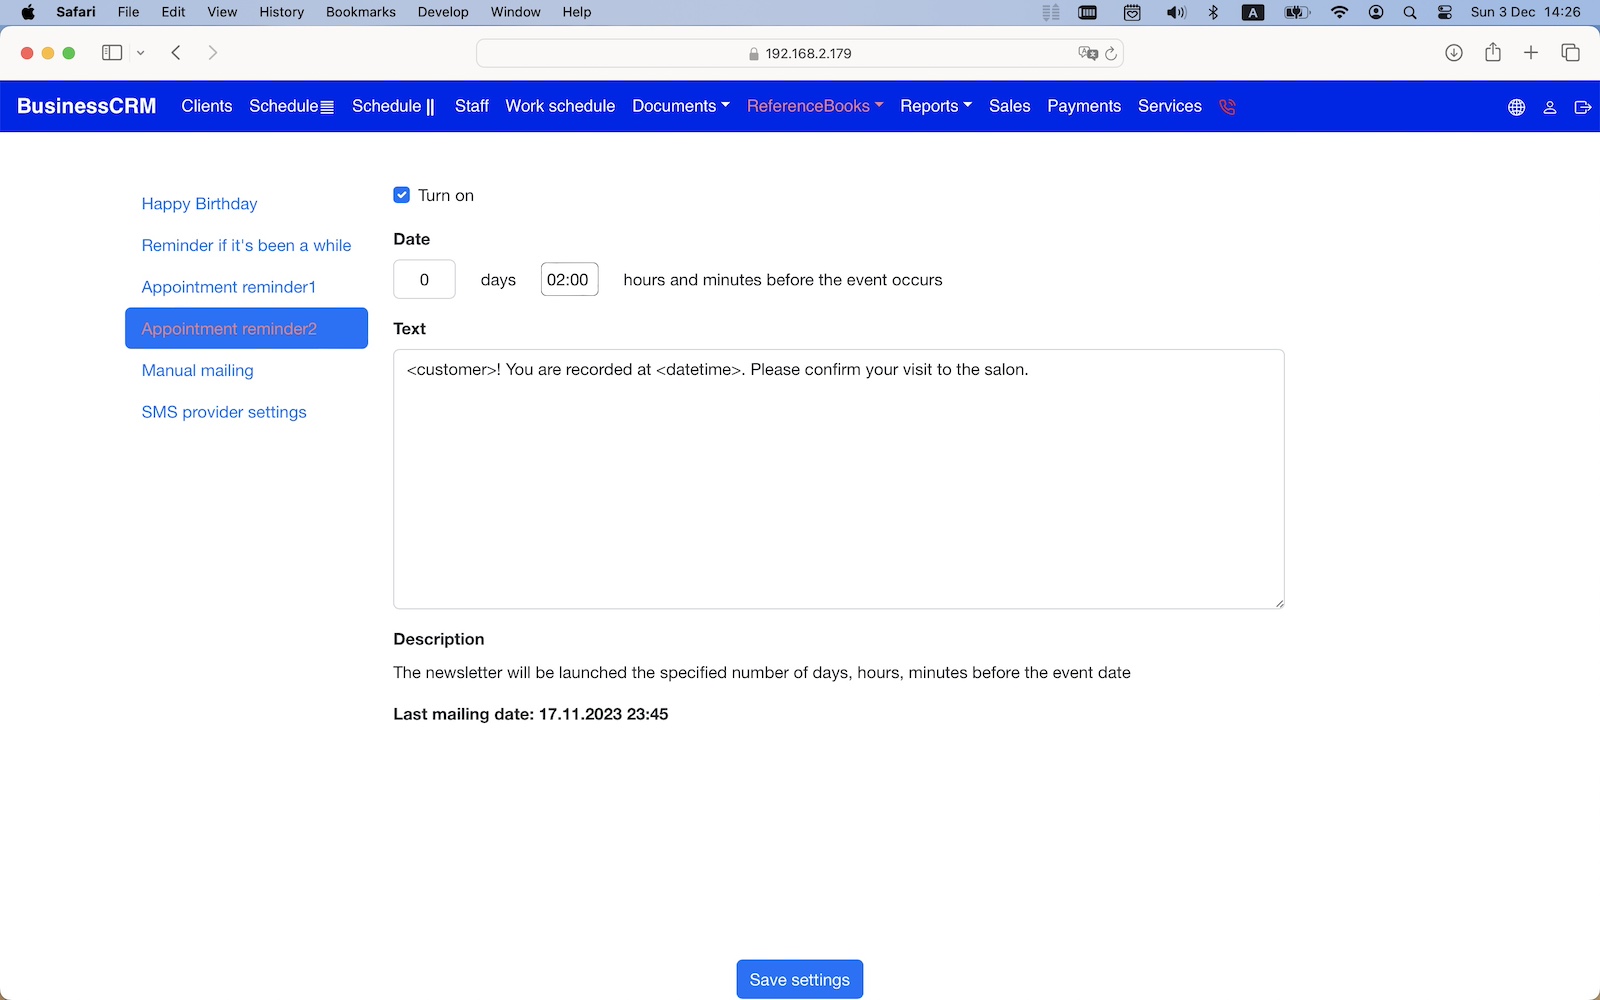
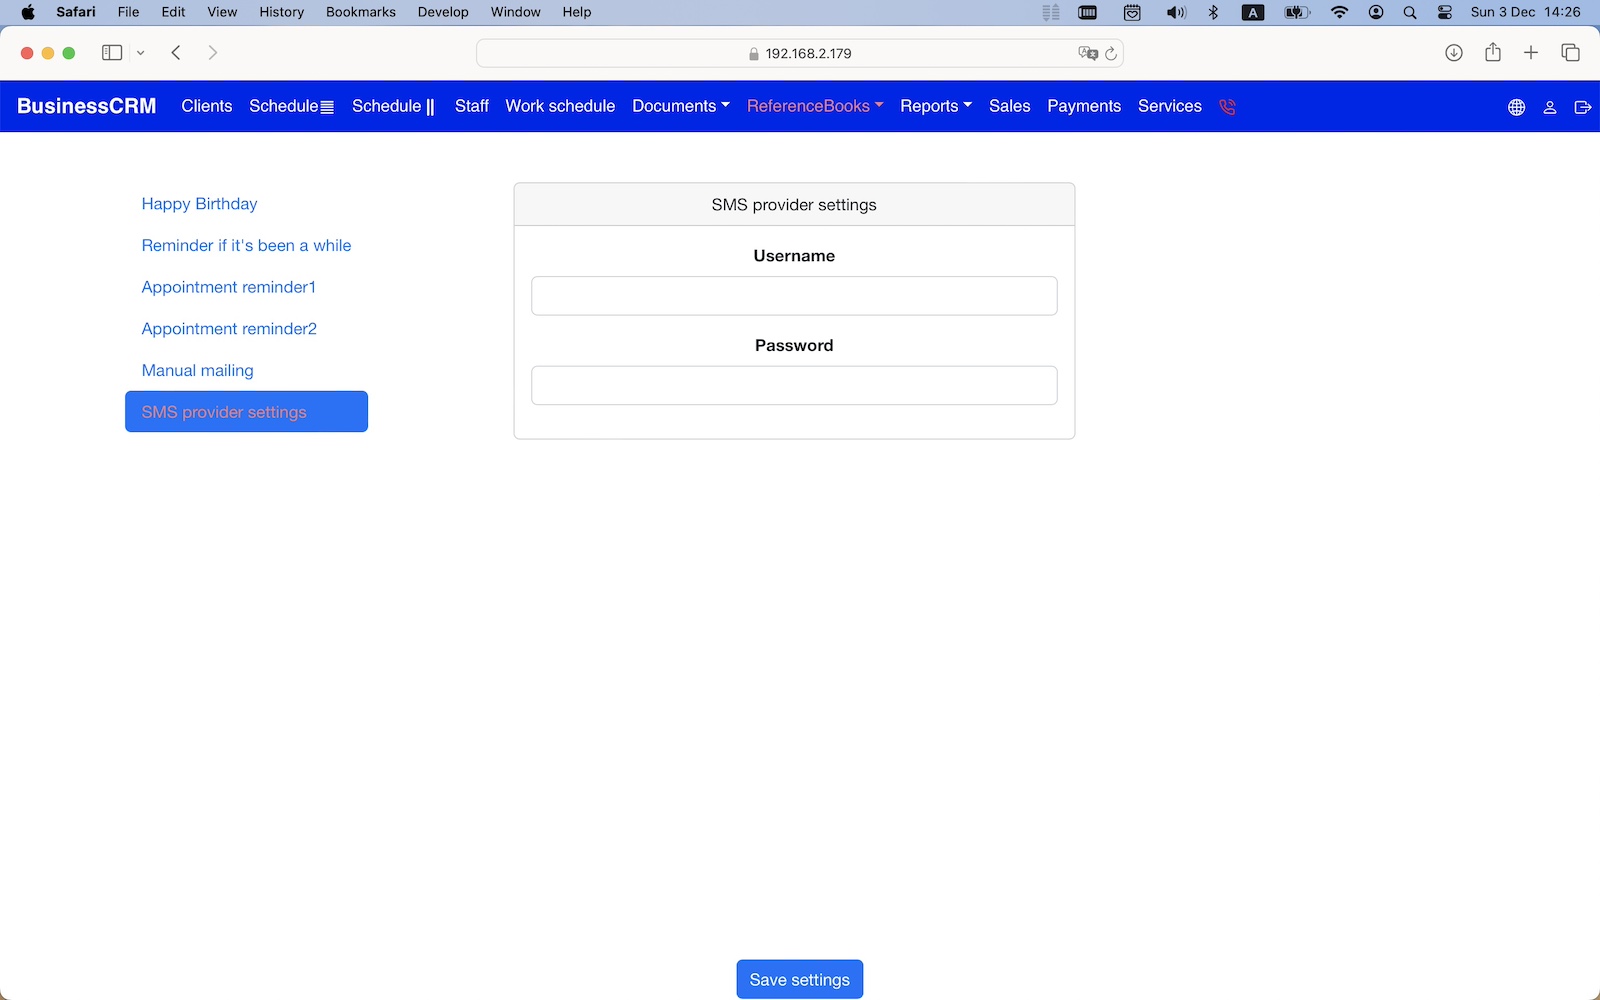
SMS Notifications
This mode allows you to automatically send SMS messages to clients. SMS messages are sent through the operator https://smsc.ru. Contact us if you need to connect another operator.
|
|
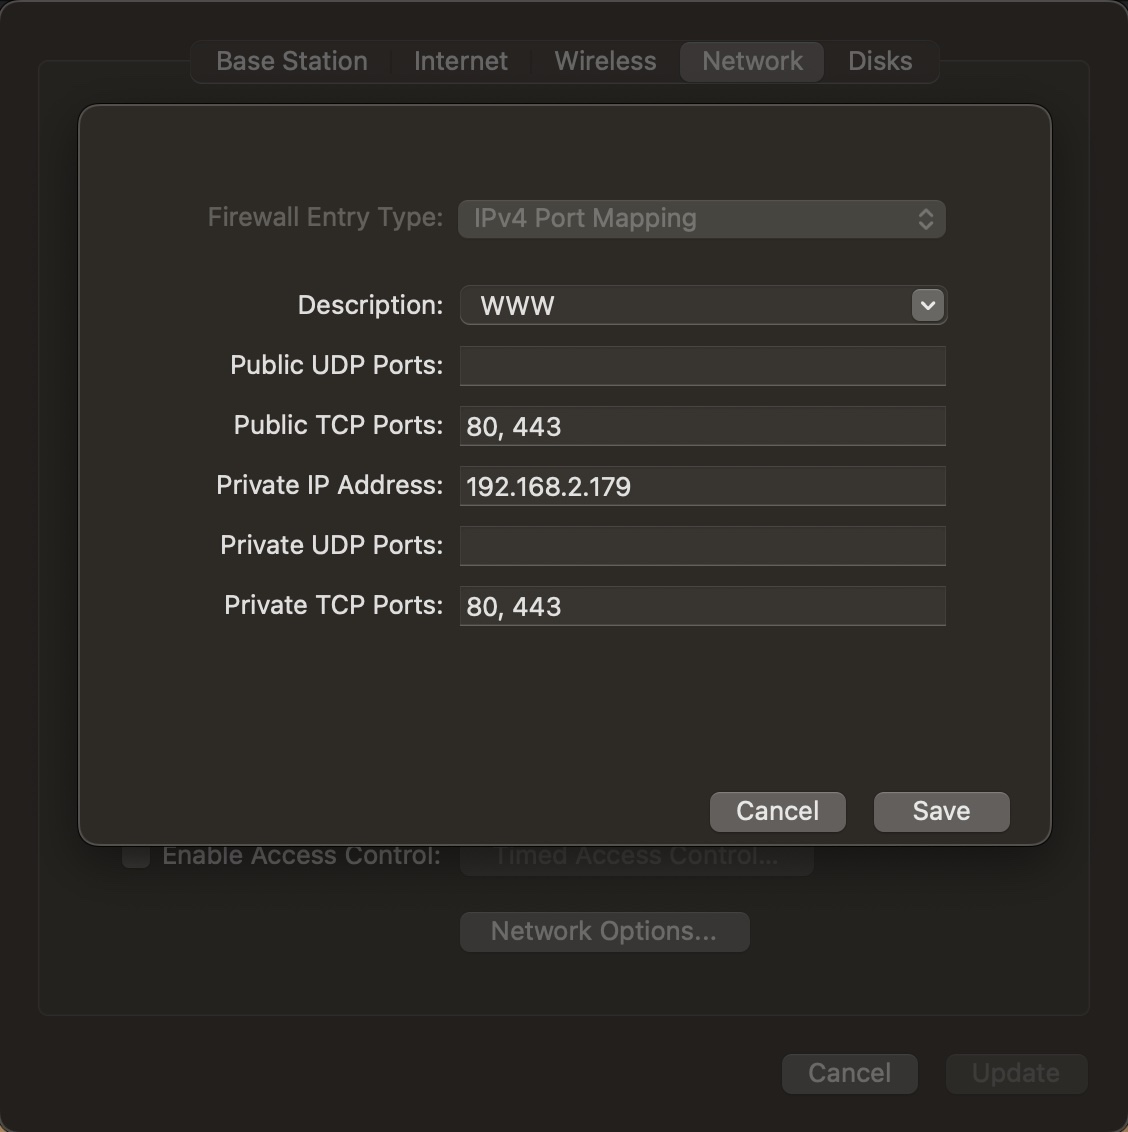
Remote app access
Forward the Web Server port (80 or 443) in the router settings to access the app over the Internet using a public IP.
|
|
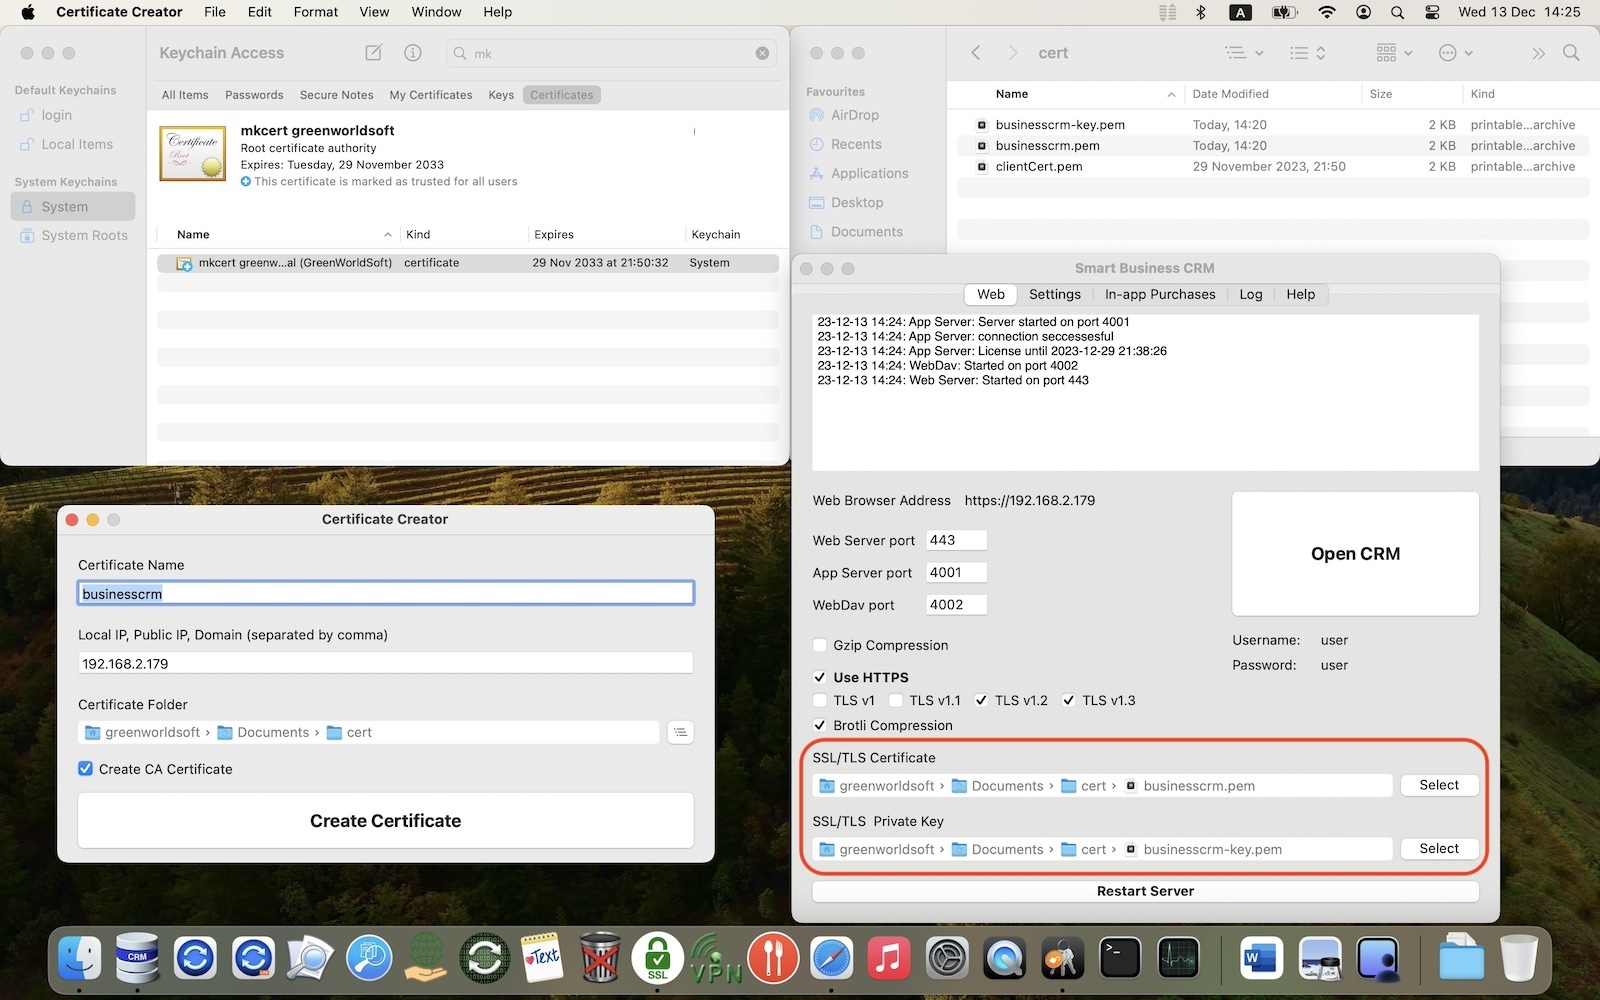
Certificate for https
Description To work app over the https protocol, you should create an SSL certificate for the Mac on which the server part of the app is installed. The https protocol allows to create a secure and faster connection between the server and client parts of the app. More efficient Brotli-compression only works with the https protocol. The https protocol is required for:
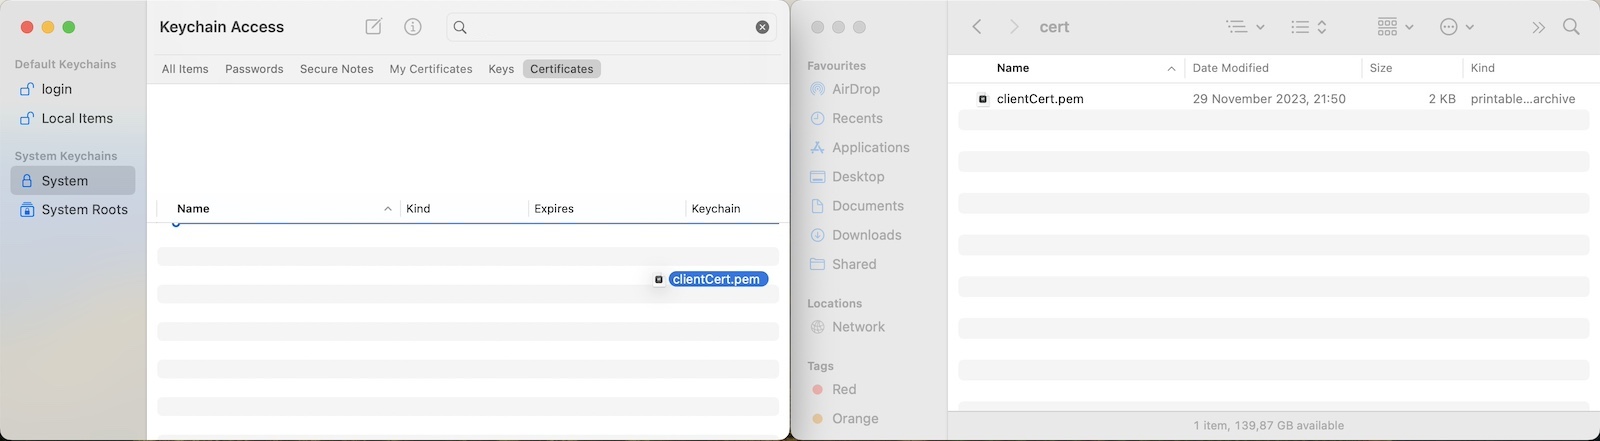
Creating an SSL certificate
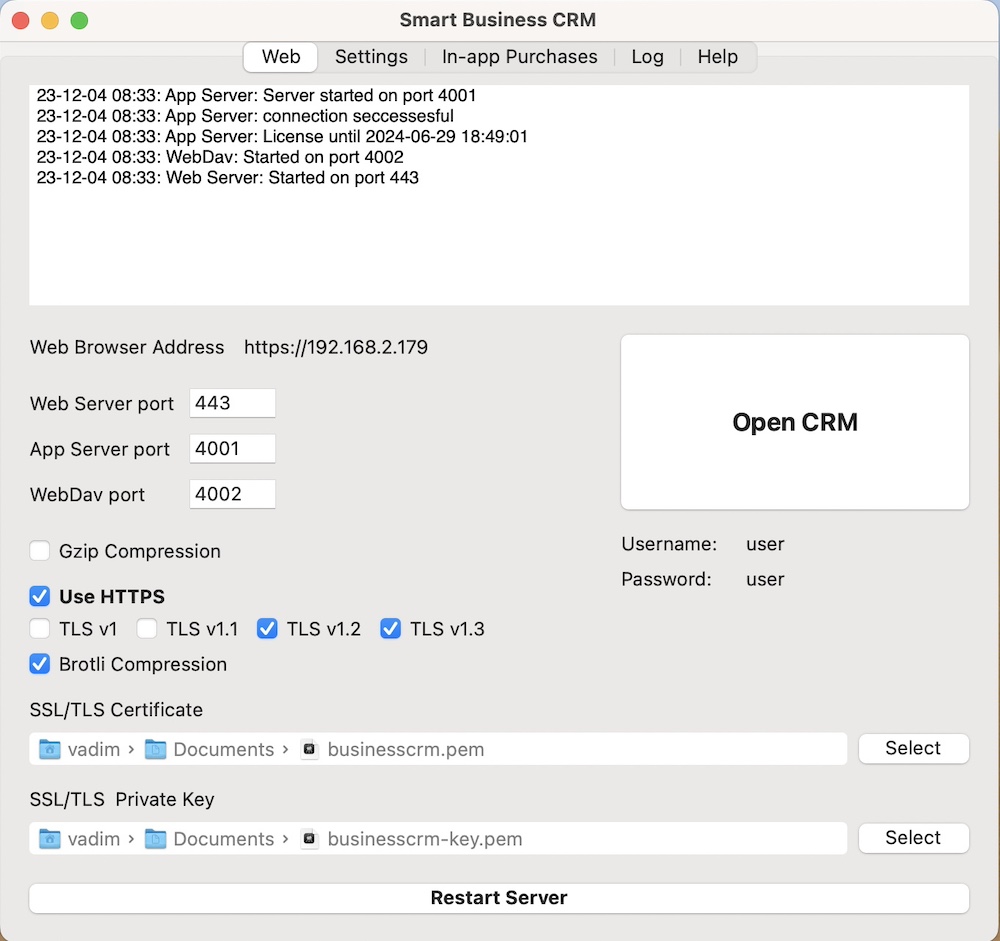
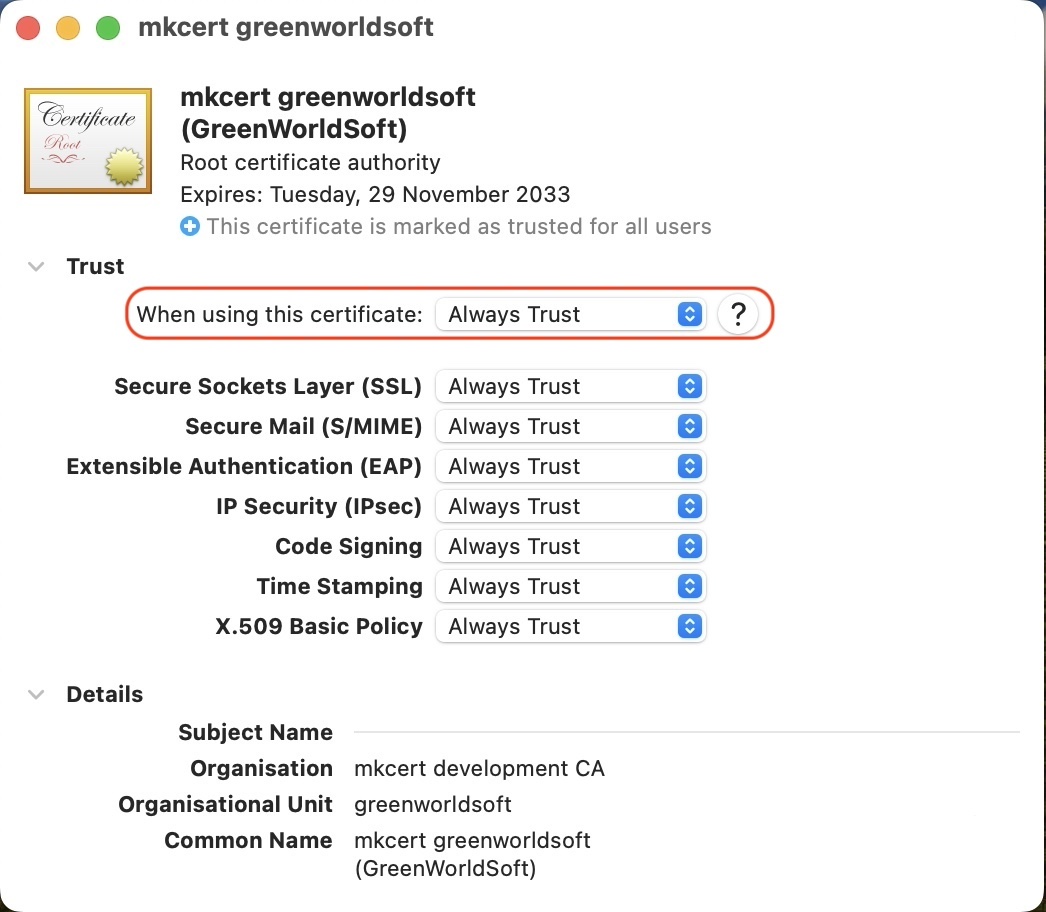
The ~/Documents/cert/businesscrm.pem and ~/Documents/cert/businesscrm-key.pem files need to be inserted into the app as in the screenshot. Installing an SSL certificate on computers with the client part of the app
|
|
App settings
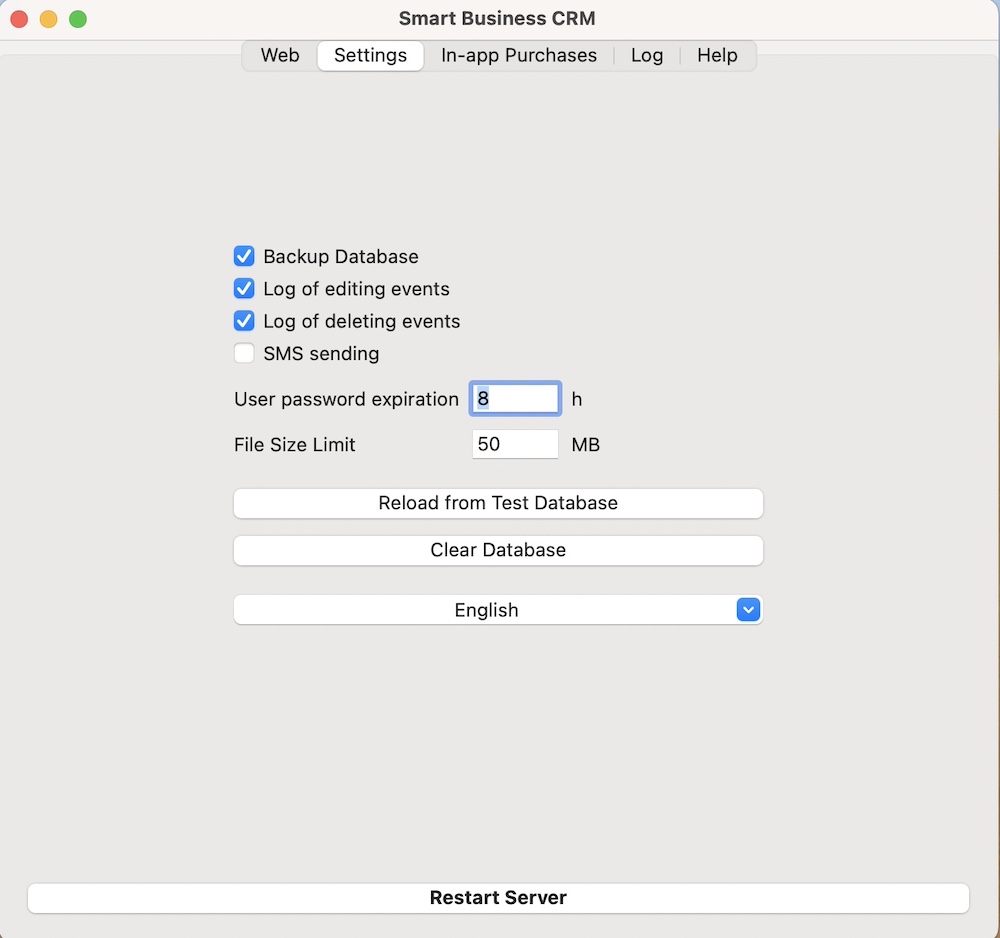
Description To open the client part of the app, click the "Open CRM" button. The Safari browser, Google Chrome, Yandex browser can be used as the client part of the app on any device (Mac, iPhone, iPad, computers with MS Windows and Linux). After making changes to the app settings, you need to click the "Restart server" button. Web port The standard port for http is 80, for https - 443. You can use any other free port if the specified ports are busy. App server port, WebDav port The app requires two ports to operate. You can use any two free ports if the default ports are busy. Use HTTPS For HTTPS to work, you need to create SSL/TLS certificates and add files to the appropriate fields. Compression (Gzip/Brotli) The transmitted content from the server to the web browser is compressed when this mode is enabled. Access to the app To start working with the app, log in with the username - user and password - user. After creating users and assigning access rights, the "user" can be deleted. Database backup When this mode is enabled, the app automatically creates a backup copy of the database file every day at 23:59. To back up folders containing snapshots, photos, MS Word files, you should use the Sync Folders Pro. Event log of editing/deleting Will be created editing/deleting events log of app documents, when this mode is enabled. SMS sending "SMS sending" mode allows you to automatically send SMS messages to clients. User password expiration date The parameter specifies after what time it is necessary to re-enter the user's password in the client part to access the app. File size limit The maximum file size uploaded through the client part of the app (for example, images, photos, MS Word files).
|
|
|
|
|
|
|
|||||||||||||||||
| Copyright © 2025 GreenWorldSoft . All rights reserved. | Site map |